Sunday, January 31, 2010

Wednesday, January 27, 2010

Baking: "Oreos"


Oreos
Ingredients
For the Dough:

* 1 1/3 cups Dutch-process cocoa powder
* 1 1/2 cups all-purpose flour, plus more for dusting
* 1/4 teaspoon salt
* 2 sticks unsalted butter, softened
* 2 cups granulated sugar
* 2 large eggs
* 1 teaspoon vanilla extract

For the Filling:

* 1 stick unsalted butter, softened
* 1/2 cup vegetable shortening
* 3 cups confectioners' sugar, sifted
* 1 teaspoon vanilla extract

Directions

Prepare the dough: Sift together the cocoa powder, flour and salt in a large bowl.

Using a mixer, cream the butter and sugar. Add the eggs one at a time, then the vanilla, incorporating each ingredient before adding the next. Add the dry ingredients and mix just until incorporated, scraping the bottom of the bowl with a rubber spatula.

Divide the dough into 2 pieces; place one piece between 2 lightly floured sheets of parchment paper and roll into a 1/4-inch-thick rectangle. Repeat with the other piece of dough. Refrigerate both rectangles, covered with the parchment sheets, until firm, at least 1 hour or up to several days.

Using a 2-inch round cutter, cut the dough into 64 circles. (You can reroll the scraps once.) Place the cookies about 2 inches apart on ungreased baking sheets and chill for 20 minutes. Preheat the oven to 325 degrees.

Bake the cookies until they are set and slightly darker around the edges, about 20 minutes. Cool completely on wire racks.

Meanwhile, prepare the filling: Using a mixer, cream the butter and shortening until fluffy. Beat in the confectioners' sugar and vanilla.

Flip half of the cookies upside down and top each with 1 level tablespoon of filling. Press the remaining cookies on top to make sandwiches.

Tacoritas


Ingredients

* 4 Tbs Vegetable Shortening
* 4 Tbs Flour
* 4 Tbs Chili Powder
* 2 tsp Garlic salt
* 4 cups Cold Water

* 2 pounds Ground Chuck
* 1/4 cup onion
* 1 cup Refried Beans
* Salt to taste
* 8 Flour Tortillas
* 1 1/2 pounds Shredded Monterey Jack Cheese
* 1/2 Head of Lettuce
* 2 Tomatoes
* 1/2 cup Sliced Black Olives
* 1 1/2 cup Sour Cream

Directions

* Preheat oven to 350 degrees.
* Melt shortening in a small pot. add flour and brown lightly to make a roux. add chili powder, garlic salt and cold water. Simmer until thickens. Set aside.
* Chop tomatoes and lettuce and set aside.
* Chop onion. Brown sausage, ground chuck and chopped onion in a large pan. Drain excess grease. Add refried beans and salt, to taste. Turn heat to low and simmer until warmed through. Spray a 9x13 inch baking dish with cooking spray. Spoon a 3 tablespoons of sauce on the bottom of pan. Take a tortilla and spoon a table spoon of sauce onto it, spreading it around. Across the center of the tortilla spread an 1/8 of the meat mixture. Top with 1/4 cup cheese. Roll up the tortilla and place in the pan. Repeat with remaining tortillas and line them up in the pan. Pour remaining sauce over tortillas. sprinkle with remaining 1 cup cheese. Bake 15 to 20 minutes or until cheese is melted and bubbly. Serve with diced tomatoes, shredded lettuce, black olives and sour cream. Yield: serves 8

The Snow Man


One must have a mind of winter
To regard the frost and the boughs
Of the pine-trees crusted with snow;

And have been cold a long time
To behold the junipers shagged with ice,
The spruces rough in the distant glitter

Of the January sun; and not to think
Of any misery in the sound of the wind,
In the sound of a few leaves,

Which is the sound of the land
Full of the same wind
That is blowing in the same bare place
For the listener, who listens in the snow,
And, nothing himself, beholds
Nothing that is not there and the nothing that is.

Wallace Stevens

Baking: Chocolate Honey Zucchini Muffins


2 cups flour
1/2 cup natural cocoa
2 tsp baking soda
1/4 tsp salt
1 tsp cinnamon
3/4 cup butter
2 tsp vanilla extract
3/4 cup honey
3 eggs
2 cups, unpeeled zucchini grated
8 ounces chocolate chips
1/3 cup raw sugar or other big crystal sugar for topping


Preheat oven to 350 degrees. Grease and flour muffin pans, 2 x 12 size muffin pans, or use liners. Sift together the flour, cocoa, baking soda, salt, and cinnamon. In a separate bowl, cream together the butter and vanilla. Slowly add the honey in a fine stream. Add the eggs, one at a time, and mix well. Add the dry ingredients 1/3 at a time, beating well after each addition. Fold in the zucchini and 2/3 of the chocolate chips by hand. Pour the batter into the muffin tin so they are 3/4 full. Sprinkle with the remaining chocolate chips and bake at 350 degrees for 20 to 22 minutes until firm. After 10 minutes or so, sprinkle the sugar on top of the half-baked muffins. If you put the sugar on before baking, it will melt in, which tastes good but doesn't look as nice. Carefully remove from the pans right away, cool a bit before eating.

Tuesday, January 26, 2010

Heirloom Tomatoes


I am trying to finalize my seed list and not get too much this year. I still have a great deal of unopened seed from last year. I grew many herbs and plants for the 4-h garden and for a workshop so summer happened before I got around to planting all that I had dreamed about early last spring. Here are a few favorite heirloom tomato varieties that I have been reading about- I have grown a few of these the past summers but am always looking for a new one to try. I usually grow my tomato plants from seed in order to get the variety that I want; however last summer I found many interesting kinds at fun little plant sales and from garden friends. Black cherry and Sun Sugar were two great varieties that I purchased last year as plants and obtained from friends.


Amish Paste Tomatoes
These heart shaped red tomatoes mature in 85 days. They have a mild flavor and grow well in poor conditions. They are good for sauces.

Aranyalma Tomato
Aranyalma is the Hungarian word for “Golden Apple”. These tomatoes are from Germany. These are yellow cherry tomatoes with a high yield and good disease resistance.

German Green Tomato
Also from Germany, these large bright green tomatoes can weigh more than a pound! They are sweet, juicy and beautiful. The German Green performs well in very hot climates.

Black Cherry Tomatoes
These cherry tomatoes are a deep purple and grow in clusters. They are a beautiful addition to salads and taste much like the bigger purple tomatoes.

Black Krim
A large red and brown tomato with bright green seeds! It has a salty and spicy flavor. Though they tend to crack, they are always delicious. These tomatoes come from the Island of Krim, in the Black Sea near Russia.

Black Russian Tomatoes
These medium sized round black heirloom varieties also come from Russia. This is a highly disease resistant variety. The plants are prolific early producers.

Brandywine Classic Pink
These tomatoes date back to 1885 and were originally grown by the Amish. These medium-sized pink tomatoes are said to taste like Brandywine.

Cherokee Purple
This variety is over 100 years old and was originally grown by the Cherokee Indians. The fruits are large and purple with pink and green spots. Has a sweet and smoky taste and performs well in high heat areas.

Glacier Tomato
These golf ball sized red tomatoes fruit in cold weather and early in the season. The plants start flowering at only four inches tall! This is a good plant for cold locations, especially coastal redwoods, but also does great in cold weather.

Green Zebra Tomatoes
These small green tomatoes begin as dark green with yellow stripes and mature to being dark green with light green stripes. They have a sweet and tart flavor and are a favorite amongst heirloom growers.

Ida Gold
These small, golden tomatoes have a high yield and do well in poor conditions. The vines are compact and good for small gardens.
Manalucie a breeder named J.M. Walter developed this rare variety in the 1950s. This was a big achievement at the time as the tomatoes are highly disease resistant and tasty. They produce medium sized red tomatoes and are a heritage variety that are excellent for southern climates. They are resistant to Blossom End Rot, Gray Leaf Mold, Early Blight and Fusarium Wilt.

Nebraska Wedding Tomato
Hailing from Nebraska, these big orange tomatoes are sweet and lovely to look at.

Orange Banana Tomato
These long, orange banana shaped tomatoes have a sweet taste with a citrus undertone; they are great for making tomato pastes and eating fresh. This is an heirloom (heritage) species you will want if you love cooking from the garden.

Pineapple Tomato
These tomatoes weigh in at almost two pounds! They are beautifully streaked with red and yellow stripes and have a distinct flavor. Very high yields.

There are so many choices of Tomatoes to Grow. I will try a few new ones this year. I think it is fun to read about the different varieties and finding out where they came from. I enjoy all the different colors, shapes, and textures.

Saturday, January 23, 2010

Baking: Salted Thyme Flatbread


SALTED THYME FLATBREAD


A great easy yeast bread to have with soup- We had it with Hearty Meatless Minestrone-

BREAD:
1¼ cups warm water (110 to 115°F.)
1½ tsp granulated sugar
1½ tsp active dry yeast
1½ tsp salt
3½ cups all-purpose flour

TOPPING:
2 Tbs olive oil
1 Tbs or less
coarse Sea salt
1 Tbs fresh chopped thyme
Rosemary and red pepper flakes

1. Place water into large bowl. Sprinkle with sugar and yeast. Let stand 5 minutes or until yeast is dissolved. Stir in salt. Gradually add flour, stirring until dough forms.

2. On a lightly floured surface, knead dough 10 to 12 minutes or until smooth and elastic. Place dough in large oiled bowl, cover; let rise in warm place until doubled in size; about 45 minutes to 1 hour.

3. Place oven rack in lowest rack position; heat oven to 450°F. Grease a 15×10x1-inch jelly roll pan.

4. Gently punch down dough to deflate. Place in pan; using palm of hand press dough to cover bottom of the pan. Cover; let rise about 20 minutes or until risen by half. Brush dough with oil; sprinkle generously with coarse salt, Rosemary, and red pepper flakes.

5. Bake 12 to 15 minutes or until light golden brown. Remove from oven and sprinkle with thyme.

Servings: 8

Cooking Tips
*If using a KA mixer with a dough hook, simply dump all of the bread ingredients into the mixer and let it do all of the mixing and kneading.
**If you’re using a bread machine, layer the ingredients in the bread pan according to the manufacturer’s instructions and let it do the kneading and the first rise. Then take it out of the machine and prep it for the 2nd rise.
recipe adapted from recipe girl


Hearty Meatless Minestrone


Ingredients

* 1 large onion, chopped
* 3 tablespoons olive oil
* 2 celery ribs, chopped
* 2 medium carrots, chopped
* 1 cup chopped cabbage
* 1 medium red pepper, chopped
* 1 medium zucchini, chopped
* 6 garlic cloves, minced
* 3-1/2 cups water
* 1 cans (14-1/2 ounces each) diced tomatoes, undrained
* 1 can (15 ounces) garbanzo beans or chickpeas, rinsed and drained
* 1 jar (28 ounces) tomato sauce
* 3 tablespoons dried parsley flakes
* 2 teaspoons dried basil
* 2 teaspoons dried oregano
* 1 teaspoon salt
* 1/2 teaspoon pepper
* 1/4 teaspoon cayenne pepper
* 1/2 cup small pasta shells or macaroni
* Fresh basil leaves and shaved Parmesan cheese, optional

Directions

* In a Dutch oven, saute onion in oil for 2 minutes. Add the celery, carrots, cabbage, green pepper, zucchini and garlic; saute 3 minutes longer. Stir in the water, tomatoes, beans,tomato sauce and seasonings. Bring to a boil. Reduce heat; cover and simmer for 15 minutes.
* Stir in pasta; cook 12-15 minutes longer or until tender. Garnish each serving with basil and cheese if desired. Yield: 8 servings (3 quarts).

Nutrition Facts: 1-1/2 cups (calculated without optional ingredients) equals 191 calories, 6 g fat (1 g saturated fat), 0 cholesterol, 664 mg sodium, 29 g carbohydrate, 7 g fiber, 6 g protein. Diabetic Exchanges: 3 vegetable, 1 starch, 1 fat.
Recipe adapted from Taste of Home

Organizing my Spice cubboard by "Shopping at Home"


This still is not perfect but better than it was. I know what spices that I am out of and now have everything where it can be found easier. I used containers that I already have and did not purchase anything new to organize the spices.

After pricing containers and shelves, I found that it could really add up to quite a bit of $$$- the cute little tins that are perfect for storing spices are about $3.00 each.

I decided to use mason jars or canning jars that I had that were just taking up space in my storage room. I cut out paper circles for under the lids and then used my label maker to add the name of the spice to the top of the lid. The jars are great for spices purchased in bulk and for being able to reach a measuring spoon inside when cooking.

I thought about painting the jar lids with chalk board paint and then writing the contents of the jar with chalk. - I may try this with some other pantry items.

I grouped everything in either alphabetical order or according to use such as baking, spicy, sweet...

Some container ideas could be loaf pans or shallow baskets.

I found that labeling the top of the lid made it easier to see the spice quickly in my deep cabinet.

Friday, January 22, 2010

Baking: Jam Crumb Cake


Jam Crumb Cake

A very easy little cake to make. I am busy cleaning my kitchen pantry and the fridge - trying to use up the odds and ends of things- so I gathered up all those partially empty jelly jars and mixed them together for the Jam in this cake. Any kind of Jam would work.

"Spreadable fruit jam ribbons through this crumb cake, sinking here and there for a marbled look. A generous crumb topping adds more flavor."
Prep: 25 minutes
Cool: 20 minutes
Bake: 40 minutes

Ingredients

* Crumb Topping (recipe follows)
* 1-1/2 cups all-purpose flour
* 1/2 tsp. baking powder
* 1/4 tsp. baking soda
* 1/8 tsp. salt
* 1/3 cup butter, softened
* 3/4 cup granulated sugar
* 1 egg
* 1/2 cup dairy sour cream
* 1 tsp. vanilla
* 1 10-oz. jar strawberry or seedless raspberry spreadable fruit- I used half peach and half orange marmalade

Directions

1. Grease a 9x9x2-inch baking pan; set aside. Mix together the Crumb Topping; set aside. In a small bowl, combine the flour, baking powder, baking soda and salt; set aside.

2. In a large mixing bowl, beat butter with an electric mixer on medium to high speed for 30 seconds. Add sugar; beat until well combined. Add egg, sour cream and vanilla and beat until mixture is smooth. Beat in flour mixture just until combined. (Batter will be thick).

3. Spread the batter into prepared pan. Spoon spreadable fruit over batter, spreading evenly. Sprinkle Crumb Topping over all.

4. Bake in a 350 degree F oven 40 to 45 minutes or until a toothpick inserted near center comes out clean. Cool in pan on wire rack for 20 to 25 minutes. Serve warm. Makes 9 servings.

5. Crumb Topping: In a bowl, mix 1-1/4 cups all-purpose flour, 1/2 cup packed brown sugar and 1 teaspoon ground cinnamon. Stir in 1/2 cup melted butter.

Recipe from Midwest Living Magazine

Thursday, January 21, 2010

Chocolate and Banana snack

If you love chocolate and bananas try this.

Banana and Chocolate Mascarpone Crepes Yield 12 crepes

For the crepes:
2 tablespoons Dutch-processed cocoa powder
1/2 teaspoon vanilla
2 eggs
3 ounces all-purpose flour
1 ounce unsalted butter, melted and cooled
1 tablespoon coffee liquor
3/4 cup Milk, 1% or higher

For the filling:
6 ounces mascarpone cheese- I am going to use ricotta
1/3 cup powdered sugar
1/2 cup heavy cream
3 tablespoons Dutch-processed cocoa powder
1 teaspoon vanilla
1 tablespoon coffee liquor
Pinch of salt
3-4 large bananas, sliced into 1/8″ disks

Additional powdered sugar for dusting


Combine the cocoa, eggs, vanilla, and coffee liquor in a large bowl until well combined. Whisk in the flour and butter and mix until there are no lumps. Set aside.

Chocolate Mascarpone and Banana Crepes

In a heavy sauce pan scald the milk (bring to a low simmer before removing from the heat). Add 1/4 of the hot milk into the egg mixture, whisking constantly, to temper, then combine the remaining milk.

Chill the batter for 30 minutes.


In a medium bowl combine the mascarpone, cream, powdered sugar, cocoa, vanilla, liquor, and salt and mix until smooth and well combined. Set aside.


After the batter has chilled, place an 8″ non-stick omelet, saute, or crepe pan over medium heat. Spray it lightly with non-stick cooking spray.


Pour 1 1/2 ounces (about 1/4 cup) of batter into the center of the hot pan an swirl the pan until the batter coats the pan evenly. Cook until the edges release from the pan and the underside of the crepe slides easily in the pan, about one minute. Flip the crepe, or turn with a rubber spatula, and cook for 30 seconds to 1 minute on the second side.

Remove to a plate and stack the cooked crepes between layers of parchment or wax paper.


To assemble spread a thin layer of the mascarpone mixture on the center of the crepe. Lay a line of bananas down the center then roll into a tube. Alternately, you can spread the mascarpone over 1/4 of the crepe, lay a few bananas on top then fold the crepe in half, and then in half again.


Serve with a dusting of powdered sugar.

Wednesday, January 20, 2010

Something to Try: Chai Concentrate- just add to a cup of Hot Tea


Chai Concentrate


Makes about 1 1/2 cups (enough for 28 cups of chai)

Unlike many brands of chai mix, this one includes the sweetener and the milk. All you add is a mug of hot tea.

Ingredients

* 1 14-ounce can sweetened condensed milk
* 1 teaspoon granulated sugar
* 1 teaspoon ground cardamom
* 1/2 teaspoon ground cinnamon
* 1/2 teaspoon ground cloves
* 1/2 teaspoon ground nutmeg

Instructions

Empty condensed milk into a jar or plastic container with tight-fitting lid. Stir in the sugar, cardamom, cinnamon, cloves and nutmeg. Store in refrigerator.

To use: Brew a cup of strong black tea, such as Assam, then add two heaping teaspoons of concentrate or more to taste. Stir well until concentrate has fully melted.

To give: Pour into small jars with lids and tie with an attractive bow, or wrap the jar first. Attach a tag with instructions to keep the mix refrigerated and how to use it.

To keep: Store in refrigerator for up to 6 months.

Idea from Angry Chicken

Minted Rice with Garbanzo Curry

Everyone enjoyed this easy and healthy meal last night for dinner.

Minted Rice

1 cinnamon stick
2 whole cloves
1/8 tsp cumin seeds
2 tsp canola oil
1 cup uncooked long grain rice
2 cups water
1/2 cup minced fresh mint leaves

Garbanzo Curry

1 medium onion chopped
1 cinnamon stick
1 T canola oil
1 tsp curry powder
1 garlic clove, minced
1/4 tsp minced fresh ginger root
1 can garbanzo beans rinsed or drained- I used 2 cans
1 cup water
1 can tomato sauce- 8 ounces
2 T lemon juice
1/2 tsp salt
1/2 cup minced fresh cilantro

In a large saucepan over Medium heat, saute the cinnamon, cloves, and cumin seeds in oil until aromatic, about 1-2 minutes. Add rice; cook and stir until lightly browned. Add water and mint. Bring to a boil. Reduce heat, cover and simmer for 15 to 20 minutes or until rice is tender.

Meanwhile, in a large skillet, saute onion and cinnamon in oil until onion is tender. Add the curry, garlic, and ginger. Cook 1 minute longer. Add the garbanzo beans, water, tomato sauce, lemon juice and salt; bring to a boil. Reduce heat; simmer, uncovered for 4 to 6 minutes or until slightly thickened. Discard Cinnamon stick. Stir in cilantro.

Fluff rice with a fork. Discard cinnamon stick and cloves. Serve with garbanzo curry.

Recipe from Taste of Home

Baking: Buttermilk Bannana Bread

This recipe make 2 large loaves. It was gone in no time.
I freeze overripe bananas and use often for smoothies but I found out that they are great to have on hand to use in banana bread.

1/2 cup butter softened- 1 stick
1 cup white sugar
4 eggs
4 very ripe bananas, mashed
1 cup buttermilk
2 tsp pure vanilla extract
4 cups flour
4 tsp baking soda
1 tsp cinnamon
1 tsp salt

Preheat oven to 350 degrees. Cream together the butter and sugar. Add the eggs and mix well. Add the remaining ingredients and mix well.
Pour into 2 well greased bread loaf pans. Bake for 1 hour at 350 degrees and let cool slightly before removing from the pans and cooling on a wire rack.

Tuesday, January 19, 2010

Adding Color with Fiestaware


With all this winter - white all over- color, I decided to add some colorful new pieces of fiesta ware to my collection of all white.

Super Peanut Butter Cookies


The Boys loved These!

Super Peanut Butter Cookies

1 cup butter, softened - 2 sticks
1 1/2 cups sugar
2/3 cup peanut butter
2 eggs
1 tsp vanilla extract
2 1/2 cups flour
1 tsp baking soda
1/2 tsp salt
2 cups peanut butter baking chips
vanilla sugar or sugar for rolling

Preheat oven to 350 degrees. Cream together butter, sugar, and peanut butter with a mixer. Beat in eggs and vanilla. Add the flour, baking soda, salt, and peanut butter chips and mix until well combined. Using a Tablespoon of dough. roll into walnut-size balls, roll in sugar and place on a greased cookie sheet. Using a dinner fork, press each ball in first one direction and then crosswise . Bake at 350 degrees for 12 to 15 minutes. cool completely.

Friday, January 15, 2010

Soup For Dinner

White Chicken Chili


2 lbs. Chicken breast
3 cans great white northern beans
2 cans chicken broth
1 tbs. Oil
1 med. Onion
2 tsp. Minced garlic
2 tsp. Garlic powder
1 can Rotel’s tomatoes & green chilies
2 tsp ground cumin
1 tsp. Oregano
½ Cayenne pepper
½ tsp. Salt
4 cups grated Monterey jack cheese (1 8 oz. Brick)
16 oz. Sour cream

Boil and shred chicken breast

Sauté onion & minced garlic with oil in skillet.
Add Rotel and spices; let simmer a few minutes.

Place all ingredients into a large pot.
Cook on medium heat for 1 hour.

Just before serving add sour cream and cheese.
Warm on med. To low heat until heated through.

Go Lions Basketball Cookies


Amaryllis is in Bloom


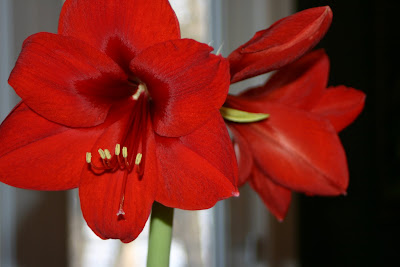
Thank you Lynn for the beautiful Amaryllis- This Gorgeous red color Brightens my spirits in all this winter weather- we have all been anxiously waiting for it to BLOOM.

Facts about this Plant:
Info from Wikipedia

Many bulbs sold as Amaryllis and described as 'ready to bloom for the holidays' actually belong to the allied genus Hippeastrum, despite being labeled as 'Amaryllis' by sellers and nurseries.


"Hippeastrum" is Greek for "horseman's star" (also known today as "knight's star") and was chosen in 1837 by the Honorable Reverend William Herbert, Dean of Manchester. While no one is entirely sure why he picked this name, it's likely he chose it because of the plant's striking resemblance to the "morning star," a medieval weapon used by horsemen, as William Herbert was both a clergyman and something of an expert on early medieval history. A version of the weapon was also called a "holy water sprinkler," an ecclesiastical object with which the Dean would have been familiar.

The first commercial breeders of Hippeastrum were Dutch growers who imported several species (see list at right) from Mexico and South America and began developing cultivars and hybrids from them in the 18th century; the first of these reached North America early in the 19th century. In 1946 two Dutch growers moved to the Union of South Africa and began cultivation there. Although most Hippeastrums come from the Dutch and South African sources, bulbs are now being developed in the United States, Japan, Israel, India, Brazil and Australia. The double flowers from Japan are particularly beautiful.

Flower characteristics


In general only a large bulb will put up more than one flower scape or spike but this depends on the cultivar itself; some smaller bulbs have two while some larger bulbs make only one. A bulb must produce at least four large, healthy leaves in the summer growing season before it can send up a scape the following year. Some bulbs put up two flower scapes at the same time; others may wait several weeks between blooms and sometimes the second scape will have only two or three flowers rather than the usual four. Dutch bulbs usually produce flowers first, then, after it has finished blooming, the plant will begin growing leaves. Bulbs from the South African growers usually put up a scape and leaves at the same time.

The flower colors include red, rose, pink, white, orange, yellow, and pale green with variations on these including different colored stripes and edges on the petals. Some flowers have uniform colors or patterns on all six petals while others have more pronounced colors on the upper petals than on the lower ones.

There are five types: 1) single flower; 2) double flower; 3) miniature; 4) cybister; and 5) trumpet. Cybisters have extremely thin petals and are often described as spider-like. Trumpets, as the name suggests, have flared, tube-shaped flowers. Single, double, and miniature bulbs are the ones typically sold by nurseries and other stores for the holidays in December and for Valentine's Day and Easter.

The miniature "Papilio" (which is a species hippeastrum, i.e., not a cultivar or hybrid but the actual plant that grows in the wild) has a unique color and pattern with broad rose-burgundy center stripes and striations of pale green on the upper petals and narrow stripes on the bottom three. "Papilio" has been crossed with both cybister and single flower Hippeastrums to produce hybrids with unusual striping.

Buying bulbs

Between 20–25 new hippeastrum cultivars come on the market every year and 10–15 are discontinued. Even though most stores and nurseries sell only a few of these, many others are for sale on the World Wide Web — as of December 2006 there were 194 different cultivars plus many species Hippeastrums for sale at online stores and auctions listed under both "hippeastrum" and "amaryllis." Newer and more exotic bulbs usually sell out the fastest.

Bulbs should be firm to the touch and greenish-white with thin brown outer layers like an onion. Nearly all bulbs for sale will be healthy but watch for and reject any that are soft, have blue or greenish mold, look decayed or appear to be extremely dried out or in a state of desiccation. Sometimes bulbs will already have a flower spike or leaves.

GROWING Hippeastrum IN POTS


Hippeastrum plants do well in either clay or plastic pots but those in clay pots may need to be watered more frequently than those in plastic. Pick a pot with open drain holes that is 10–15 cm (4–6") wider than the bulb. Soak the bottom of the bulb with the roots in warm (not hot) water — this will make them pliable and easier to spread out in the pot. Position the bulb so the top third is above the soil line. Use any good commercial potting soil and, if desired, top it off with a light covering of orchid mix or sphagnum moss as mulch.

Put the bulb where it will get some sun everyday and water it once. Care should be taken not to over-water: after the first watering do not water again until growth is visible or the soil has become bone dry, and then water sparingly. Too much water will cause the bulb and its roots to rot — at this stage the bulb is not capable of absorbing much water. Watering can be increased to weekly after a 20 cm (8") flower spike with bud or two 25 cm (10") leaves have appeared. Do not feed the bulb while it is blooming.

Most new Hippeastrums take between two weeks and three months to bloom after they have been potted. They may wait a few weeks or months and then rebloom, or they may be finished for the year. New bulbs usually produce a flower spike with four flowers but two or three flowers are not uncommon.

Some Hippeastrums grow both very long leaves and stems that may bend or even break under the weight of the flowers. Stake these with a wire plant support or by inserting a thin bamboo stick or dowel in the soil next to the bulb and then tying it loosely to the stem with wire ties or string. After blooming remove the flowers and allow the stem to die back until it turns yellow and sags, then cut it to within 5 cm (2") of the bulb. Keep the plant indoors in a sunny location until the time comes to move it outside for summer.

Summer care

In most parts of the continental U.S., bulbs can be moved outside by or before the end of May. Remember this is a semi-tropical plant that needs an extended growing season and there is not enough light in the average home for them to do well. Bulbs do need some sun during the day but their leaves may burn if they are subjected to prolonged periods of hot afternoon sun during summer. Water regularly and feed every other week with a general houseplant water-soluble fertilizer — or use a granulated fertilizer when repotting in the fall. A hot weekend with no water will not harm the bulb, but allowing it to sit in wet soil for several weeks will probably cause the bulb and its roots to rot; this condition also makes it more vulnerable to parasites and disease .

If desired, pots with bulbs can be buried in the garden for less maintenance and watering; in this case they also look more "natural" in the garden setting but they will have to be dug up in the fall. Hippeastrum roots do need oxygen (many species are epyphitic), so when potting or planting make sure sphagnum moss does not go deeper than 1 cm below the bulb and use a granulated mixture (starting with the smaller granules and ending with the biggest — either perlite, pouzzolane, akadama or clay balls) in the root area to keep a good level of gas exchange and protect your plant from root rot.

Fall (Autumn) care

In the Northern hemisphere, except in very hot climates, cut back on watering in September; in the Southern hemisphere, March. This is done to prevent rot as the bulb enters its resting period and no longer requires regular watering. If it continues to rain then move the bulb inside or to a covered porch. Otherwise, bulbs can be left outside in the sun until the night temperature reaches about 10 °C (50 F). Bulbs can survive a light frost, but not a heavy freeze. Begin the inspection/repotting phase in October or early November in Northern latitudes / April to May in Southern latitudes (depending on location and temperature): remove the top 5–7 cm (2–3") of soil and pull the bulb up. Inspect the roots for signs of parasites, disease or rot (note: healthy roots are white and slightly fuzzy). If the bulb and its roots look healthy, then put it back in its pot and replace the soil removed with new soil. Replace all soil every other year. If desired add 5 cc (1 teaspoon) of granulated fertilizer to the pot before replacing the bulb — in which case do not feed it during the summer (see above). Cut off any yellow or dead leaves.

Hippeastrum plants produce more flowers when they are pot-bound and not putting their energy into growing new roots so many can be left in the same planter year after year; others may require a larger pot after a couple of years. Bulbs may produce offsets or daughter bulbs. These can be left with the mother plant until they reach blooming size and then removed and planted on their own.

There is a misconception that Hippeastrum needs a period of total darkness before they will bloom again. This is not true, what they need is a rest period in a room with average light where the temperature is between 7–16 °C (45–60 F). This confusion no doubt comes about because two other popular plants sold during the winter holidays, Christmas cactus and Poinsettia, do require exact periods of light and complete darkness to set buds.

Most Hippeastrum need a rest period with light monthly watering of at least six weeks although others may require as long as three or four months. Often the plant will send up a flower spike or leaves when it is ready to resume growing in which case put it in a sunny window and water it once. A bulb that has not begun growing on its own after the rest period can be brought out and watered once. Usually the warmer temperature, sunlight and water will prompt it to begin growing again.

Tuesday, January 12, 2010

What to make in my shiny new red LeCreuset Pot


I have used my brown Lecreuset pot nearly everyday. But found it was not quite big enough for a large recipe of soup. Marsha shared a couple of corn chowder recipes with me today- so I followed the recipes as close as I could with the ingredients that I had on hand. It made the perfect amount for this new pot. The soup was great. I substituted Roasted red Peppers for the Poblanos and then added about a 1/4 of a cup of diced jalapenos to add some spice.

Corn Chowder with Roasted Poblanos


Ingredients:
2 T butter
1 large onion diced
2 cloves garlic minced
1 stalk celery, chopped
1/4 c + 1 T flour
6 c vegetable stock
2 c milk plus 1/4 cup half and half
1 1/2 lbs, new potatoes, unpeeled and diced (I used Yukon Gold)
3 poblano chilies, roasted and chopped
1 16 oz. pkg frozen corn
1 red pepper, roasted and chopped
a couple good pinches of cayenne pepper or smoked paprika


In a large pot, melt the butter and add onion, celery and garlic. Reduce to low and add the flour, stirring to make a roux. Cook over low heat to allow the flour to cook out. Turn heat to high and slowly whisk in the stock. Add the milk and bring soup to a rolling simmer, stirring often. Add the potatoes, chilies, peppers and corn. Simmer uncovered for 30 min or until potatoes are cooked through. Add cayenne pepper to taste. Top with goodies like: a squeeze of fresh lime juice, sour cream, chopped cilantro or oregano, avocado, grated sharp cheddar cheese.

Monday, January 11, 2010

Chocolate Peppermint Ice cream Torte


A four layer cake filled with peppermint ice cream and topped with chocolate syrup and crushed peppermint candies.

Cake:
1 1/2 cups flour
1 1/2 cups sugar
1 1/4 tsp salt
1/2 cup cocoa powder
1/2 cup shortening
1 cup milk
1 tsp vanilla extract
2 eggs


Ice cream filling:

1 pt half and half
2 tsp vanilla extract
1 cup mini marshmallows
1 cup crushed peppermint candies- reserve some for topping
3/4 cup chopped pecans
1/4 cup powdered sugar

Preheat oven to 350 degrees. To make the cake: Grease and flour 4 9 inch round cake pans and set aside. cut waxed paper rounds the size of the pan and place them in the pans just prior to filling with batter. In a large mixing bowl, sift together the flour, sugar, baking soda, salt and cocoa. Add the shortening, milk and vanilla and beat for 2 minutes. Add the eggs and beat for 2 more minutes. Divide the batter among the pans. Bake at 350 for 15 minutes. cool for 10 minutes on a cooling rack. carefully remove the cake from the pans. These are thin cakes.

To make the ice cream filling- mix all the ingredients in a chilled bowl. Freeze according to an electric ice cream makers instructions.

Place one cake layer on a plate and spread the ice cream filling evenly among each layer stacking the next cake layer on top of the ice cream filling. wrap the cake tightly with tin foil and place in the freezer for a few hours or over night. Cut frozen cake into slices and serve topped with chocolate syrup and crushed peppermint candy.

Quinn's 1st Basketball Game


They Won their first game! It was so fun to watch- all the boys were very excited and nervous- so Cute!

Friday, January 08, 2010

Cooking: Sweet-Potato Corn Chowder


This is a spicy soup from the January/February issue of Midwest Living- featuring lots of comfort food recipes.

Ingredients:


* 12 oz. andouille, kielbasa or smoked pork sausage,halved lengthwise and cut into 1/2-inch slices

* 1 large onion, chopped (1 cup)

* 2 stalks celery, chopped (1 cup)

* 1 Tbsp. minced garlic (6 cloves)

* 3 Tbsp. all-purpose flour

* 1-1/2 tsp. ground cumin

* 1-1/2 tsp. chili powder

* 1 tsp. Cajun or Creole seasoning

* 6 cups chicken broth

* 1 16-oz. pkg. frozen whole kernel corn or 3 cups fresh sweet corn kernels

* 2 cups 1/2-inch cubes peeled sweet potato (about 2 small)

* 12 oz. skinless, boneless chicken breast halves, cut into 3/4-inch pieces

* 1 cup whipping cream

* 1 tsp. freshly ground black pepper

Directions

1. In a 6-quart Dutch oven, brown sausage over medium heat for 5 minutes, stirring occasionally. Add onion, celery and garlic. Cook and stir for 5 minutes. Stir in flour, cumin, chili powder and Cajun seasoning. Cook and stir for 2 minutes more. Stir in chicken broth. Bring to boiling.

2. Add corn, sweet potatoes, and chicken. Return to boiling; reduce heat. Simmer, covered, about 20 minutes or until sweet potatoes are tender. Stir in whipping cream and pepper; heat through. Makes 8 to 10 main-dish servings.
Sweet Potato Corn Chowder

Thursday, January 07, 2010

Baking: Hot Chocolate Snowballs


It is too cold to go outside today- and we have another snow day. These are great little cookies to have with a hot beverage. We are Enjoying these snowballs inside the warm house!


2/3 cups butter, softened
3 ounces cream cheese, softened
2/3 cup Hot chocolate mix
1/3 cup powdered sugar
2 tsp vanilla extract
1 3/4 cup flour
1/4 cup salt
1 cup finely chopped pecans
1/2 cup extra powdered sugar for rolling

In a large mixing bowl, cream together the butter, cream cheese, hot chocolate mix, powdered sugar, and vanilla. In a seperate bowl, sift together the flour and salt. Gradually add to the creamed mixture and mix until well blended. Stir in the pecans. Cover and refrigerate for 1 hour.

Preheat oven to 350 degrees. Roll the dough into 1-inch balls. Place 1 inch apart on ungreased baking sheets. Bake at 350 degrees for 15 to 18 minutes. Roll warm cookies in powdered sugar and place on wire racks to cool. I rolled them one more time in the powdered sugar after they cooled.

This recipe comes from the Penzeys spices

Wednesday, January 06, 2010

Baking: Whole Wheat Bread from freshly ground wheat


I made this bread this morning using wheat from my dad's fields. I used the Vitamix to grind the wheat and then to mix up the dough. Very fast and easy. This is a recipe from the Vitamix book.

1 1/4 cup warm water
1 T active dry yeast
1 T honey
1 3/4 whole kernel wheat or 2 1/2 cups whole wheat flour- (frozen wheat prevents overheating and preserves enzymes)
1 tsp salt
1 T olive oil
1 tsp lemon juice

makes 1 loaf

1. Measure 1 3/4 cup of wheat. Measure 1 tsp salt.
2. Place the wheat and the salt in the DRY Container for the Vitamix. Secure the lid tightly. Turn machine on High and grind for 1 1/2 minutes. do not overprocess.
3. Measure 1 1/4 cups of water. Add 1 T yeast and 1 T honey to water. Stir and let set 3 to 5 minutes.
4. Remove lid of the vitamix. You will notice a hole in the center of the flour. Pour the water, yeast and honey mixture directly into the hole in the flour. Add 1 T oil and 1 tsp lemon juice.
5. Secure the lid. Turn machine on High and run for 1 second. Turn the machine off. While dough rests for a moment, lightly coat a loaf pan with cooking spray.
6. With machine off, remove lid. Use a wet spatula to scrape dough from the sides of the container and Pull dough toward the center of the container. With switch on High quickly turn machine on and off 5 times. Repeat steps until the dough binds together in a soft elastic mixture. Dough with form a ball on the top of the blades.
7. Invert the container over the prepared pan. Use a wet spatula to remove any remaining dough. With wet spatula, shape the loaf. Let the dough rise just to the top of the pan- 15 to 20 minutes. Turn oven to 350 degrees. Bake for 35 to 40 minutes. Remove to a cooling rack.

Crafting: vinyl art and card making


With all this snow and cold weather, it is great to stay inside and just play with paper and crafty things. We have no school today due to more snow a coming. We will have to come up with some fun things to do inside today.

Monday, January 04, 2010

Making: Spicy Caramel Popcorn


Spicy Caramel Popcorn
Adapted from The Craft of Baking and Smitten Kitchen

This is a salty, spicy grown-up caramel popcorn — the taste will surprise you if you are expecting traditional caramel popcorn, and may delight you if you were never into the original.

I used 1 teaspoon coarse sea salt in this recipe- the original recipe calls for a lot more so adjust the salt to your liking and more importantly the amount of cayenne pepper to your liking.

The first batch I made into a traditional caramel popcorn by leaving out the spice or nuts. I am mixing this with a couple batches of plain popcorn, m$ms, pretzels, some kind of cereal, and what ever else sounds good to use as a snack for the cub scout pack meeting tonight.

But for my family, we will be having the spicy version. - Grown up CrackerJacks


Makes 4 quarts

Nonstick cooking spray or vegetable oil
3 tablespoons vegetable oil
1/2 cup popcorn kernels
2 cups salted peanuts (optional)
1 1/2 teaspoons baking soda
1/4 to 3/4 teaspoon cayenne pepper
3 cups sugar
3 tablespoons unsalted butter
1 teaspoon coarse sea salt

Lightly coat two large, heatproof rubber spatulas, a very large mixing bowl and two large baking sheets with nonstick cooking spray or a thin slick of oil.

In a large saucepan or pot with a lid, heat the oil over medium-high heat. Add the popcorn kernels, cover and keep the saucepan moving until all of the kernels have popped, about 5 minutes. Transfer to the prepared bowl, removing any unpopped kernels. Toss with salted peanuts, if using.

In a small bowl, whisk together the baking soda and cayenne pepper.

Have the two large baking sheets ready. In a medium saucepan, combine the sugar, butter, salt and 1/2 cup water. Cook over high heat, without stirring, until the mixture becomes a light golden-yellow caramel, 10 to 14 minutes. Remove from the heat and carefully whisk in the baking-soda mixture (the mixture will bubble up).

Immediately pour the caramel mixture over the popcorn and don’t fuss if it doesn’t all come out of the pot — you’ll have plenty. Working quickly and carefully, use the prepared spatulas to toss the caramel and popcorn together, as if you were tossing a salad, until the popcorn is well coated.

Spread the popcorn onto the baking sheets and quickly separate them into small pieces while still warm. Cool to room temperature, about 15 minutes. Once cool, store in an airtight container for up to two weeks.

Making: A few more note cards


You May also like

Related Posts with Thumbnails