1/2 pound fresh salmon- (I used frozen that I roasted in a 375 degree oven until cooked)
4 Tablespoons butter
1/4 cup minced green onions
1 clove garlic, minced- (I used 4 cloves)
1/4 cup all-purpose flour
2 cups milk
3 cups half and half
1/2 cup tomato puree- (I used a 14 ounce can stewed tomatoes chopped fine)
2 Tablespoons dry sherry- (I used dry white wine)
1 tsp salt
1 Tablespoon minced fresh dill
1/4 tsp ground pepper
Garnish: Fresh dill
6-8 servings
Poach Salmon. Cool, Flake and set aside. In a large saucepan, melt butter, stir in green onions and garlic, and saute until onions are transparent. Blend in flour. Cook, stirring constantly, for 5 miutes. Slowly whisk in milk and half and half, stirring until thickened. Add flaked salmon, tomato puree, sherry, salt, dill weed and pepper. Simmer covered for 15 minutes. To serve, garnish with fresh dill.

Just living the Simple Nebraska Life and sharing my love for all things vintage & charming. Come and see what projects I've been working on.
Wednesday, February 24, 2010
Tuesday, February 23, 2010

Thursday, February 18, 2010
Baking: SNAP-OODLE

Here is a great little recipe that is so easy to make and quick. I made it this morning for the boys. It smells great while it bakes. It is kind of like a giant cinnamon sugar biscuit or coffee cake. We were intrigued by the name - SNAP-OODLE- the boys could not stop saying it. I could not find any other recipes for it- I found this one in the Daughters of the Nile cookbook.
SNAP-OODLE
1 egg
1/2 cup sugar
1 cup rich milk
2 cups flour
3 tsp baking powder
Dash salt
Spread in a pan 1/2 inch thick. Dot Generously with butter and spread generously with brown sugar and sprinkle with cinnamon. Bake at 375 degrees 10 to 15 minutes or until done.
Wednesday, February 17, 2010
Johnny Mazetti: A Casserole from a vintage cookbook
We had this homey casserole dish for dinner last night- kind of like spaghetti or Lasagna.. I found the recipe in a 1965 cookbook from Hastings Nebraska called Daughters of the Nile.
What is the Dish Johnny Marzetti, I wondered?
Wikipedia says this:
Johnny Marzetti is a baked pasta dish, or casserole, consisting of noodles, tomato sauce, ground beef, and cheese. Other ingredients and seasonings may be added to adjust the taste. The dish originated in Columbus, Ohio, at the Marzetti restaurant, and spread to other parts of the United States as variations of the recipe were published in magazines and cookbooks during the mid-20th century. The dish is still served in Ohio, especially at social gatherings and in school lunchrooms.
Johnny Marzetti also gained a great deal of popularity in the Panama Canal Zone, where it was served at social occasions and on holidays since at least the early WWII era. The Canal Zone version of the dish typically includes celery and green olives, and is almost always spelled "Johnny Mazetti" by Zonians. The importance of Johnny Mazetti to the culture of the Canal Zone was such that most Zonians are unaware of the origin of the dish and are surprised to learn that it did not originate there.
Johnny mazetti
1/2 pound chopped onion
1/2 pound chopped green peppers
1/2 clove garlic
1/2 cup diced celery
2 pounds ground beef
1 can tomatoes
1 can tomato paste
salt, pepper, and favorite herbs
1 can spaghetti sauce
1 can mushrooms
1 small jar stuffed green olives
1/4 pound grated yellow cheese
1 pkg wide noodles
Fry onions, peppers, celery and garlic in oil. Then add and fry ground beef and seasonings. Add sauces and tomatoes, mushrooms and diced olives. Simmer 15 minutes. Add cooked noodles. Mix. Put in a large flat pan and cover with grated cheese. Bake in a slow oven 30 minutes.
Coconut Chicken Chili

Coconut Chicken Chili
This is a great recipe - very Thai like dish-
Adapted from Better Homes and Gardens and Noble Pig
12 oz. skinless, boneless chicken breasts, cubed (smaller pieces are best)
1 large onion, chopped
1-1/2 teaspoons chili powder
1-1/2 teaspoons ground ginger
1/4 teaspoon cayenne pepper
1 Tablespoon olive oil
1 Tablespoon all-purpose flour
1 14 oz. can unsweetened coconut milk
1 Tablespoon peanut butter
1 15 oz. can cannellini beans, rinsed and drained
3 medium carrots, shredded with a box grater on the biggest holes
1 stalk celery, sliced
2 green onions, sliced
5 cloves garlic, minced
2 Tablespoons chopped fresh basil
Garnish with fresh basil, peanuts and sliced pickled jalapenos, optional
Serve over hot cooked jasmine rice
In a large saucepan cook chicken, onion, chili powder, ginger, 1/2 teaspoon salt, 1/2 teaspoon black pepper and the cayenne pepper in hot oil over medium heat for 6 to 8 minutes or until chicken is no longer pink. (Do not over cook the chicken here, you just don't want to see pink.) Stir in flour and cook 1 minute more. Stir in coconut milk, peanut butter and 1 cup water. Bring to boiling, stirring occasionally.
Stir in beans, carrots, celery, green onion, garlic and chopped basil. Return to boiling; reduce heat. Simmer, covered, 10 minutes. Serve with rice. Top with basil leaves.
This chili is not overly salty. When served over jasmine rice prepared with a little salt, it has the perfect seasoning.
Baking: Cheesecake Factory Key Lime Cheesecake

Cheesecake Factory Key Lime Cheesecake
Ingredients
* 1 3/4 cups graham cracker crumbs
* 5 tablespoons melted butter
* 1 cup sugar
* 1 tablespoon sugar
* 3 (8 ounce) packages softened cream cheese
* 1 teaspoon vanilla
* 1/2 cup lime juice- half as much if using Key Limes- they are very strong
* 3 eggs
Directions
1.
Preheat oven to 350°F
2.
Make crust by combining the graham crackers with the butter and 1 tbs sugar.
3.
Stir so that all is coated with butter, but keep it crumbly.
4.
Press the crumbs onto the bottom and about half way up the side of an 8 inch spring form pan. You don't want the crust to form all the way up the back of the cheesecake slices.
5.
Bake for 5 minutes and set aside until you are ready to fill.
6.
In large mixing bowl, combine sugar, vanilla, and cream cheese and blend with electric mixer until smooth.
7.
Add lime juice and eggs and continue to beat until smooth and creamy.
8.
Pour the filling into the pan and bake for 60-70 minutes. If you notice top of cake turning light brown, cheesecake is done. Remove from oven and cool.
9.
When cheesecake has cooled to room temperature, put it into the refidgerator. Once cheesecake has chilled (approx 45 minutes later), remove the pan sides and cut cake.
10.
Serve with whipped cream if desired.
11.
Enjoy!
Tuesday, February 16, 2010
Baking King Cake for Fat Tuesday


Here is a great recipe for Mardi Gras Day. We enjoyed this King cake for dessert last night. It is like a giant cinnamon roll only with a subtle taste of lemon and nutmeg. I did not have any purple sugar for decorating so I used hot pink.
What's a King Cake?
"The King Cake tradition came to New Orleans with the first French settlers and has stayed ever since. Like the rest of Mardi Gras during those early days, the king cake was a part of the family's celebration, and really didn't take on a public role until after the Civil War. In 1870, the Twelfth Night Revelers held their ball, with a large king cake as the main attraction. Instead of choosing a sacred king to be sacrificed, the TNR used the bean in the cake to choose the queen of the ball. This tradition has carried on to this day, although the TNR now use a wooden replica of a large king cake. The ladies of the court pull open little drawers in the cake's lower layer which contain the silver and gold beans. Silver means you're on the court; gold is for the queen.
"With the TNR making a big deal over the king cake in the society circles, others in the city started having king cake parties. These parties particularly among children, became very popular and have also continued to today. The focus of today's king cake party for kids has shifted more to the school classroom than the home, however. Up through the 1950s, neighborhoods would have parties. One family would start the ball rolling after Twelfth Night, and they'd continue on weekends through Carnival. Whoever got the baby (the coin or bean had changed to a ceramic or porcelain baby about an inch long by then) in the king cake was to hold the next party. You can still hear stories from folks who were kids during the Great Depression of what their mommas would do to them if they came home with the baby from a king cake party, since so many families were short on money then.
"[Today,] schools and offices are the main sites for king cake parties these days. Someone will pick up a cake at the bakery on the way downtown and leave it out for everyone to grab a piece, or mom will send one to school on a Friday for the kids to share. You an always tell the locals from the transfers in any given office because the local knows what to do when he or she gets the baby. The foreigner just drops it on the counter or some such, and possibly might not even bring the next cake. Sacrilege."
NOTE! You may NOT prepare and serve this before Twelfth Night (Jan. 6) or after Mardi Gras Day!
If you're not in New Orleans and you don't feel like mail-ordering, you can always make your own. Here's an excellent King Cake recipe, provided courtesy of Chef Emeril Lagasse."
* 2 envelopes active dry yeast
* 1/2 cup granulated sugar
* 1-1/2 sticks (6 ounces) unsalted butter, melted
* 1 cup warm milk (about 110°F)
* 5 large egg yolks, at room temperature
* 4 1/2 cups bleached all-purpose flour
* 2 teaspoons salt
* 1 teaspoon freshly grated nutmeg
* 1 teaspoon grated lemon zest
* 1 teaspoon vegetable oil
* 1 pound cream cheese, at room temperature
* 4 cups confectioner's sugar
* 1 plastic king cake baby or a pecan half
* 5 tablespoons milk, at room temperature
* 3 tablespoons fresh lemon juice
* Purple-, green-, and gold-tinted sugar sprinkles
Combine the yeast and granulated sugar in the bowl of a stand mixer fitted with a dough hook. Add the melted butter and warm milk. Beat at low speed for 1 minute. With the mixer running, add the egg yolks, then beat for 1 minute at medium-low speed. Add the flour, salt, nutmeg, and lemon zest and beat until everything is incorporated. Increase the speed to high and beat until the dough pulls away from the sides of the bowl, forms a ball, and starts to climb up the dough hook. (If the dough is uncooperative in coming together, add a bit of warm water (110 degrees), a tablespoon at a time, until it does.)
Remove the dough from the bowl. Using your hands, form the dough into a smooth ball. Lightly oil a bowl with the vegetable oil. Place the dough in the bowl and turn it to oil all sides. Cover with plastic wrap and set aside in a warm, draft-free place until doubled in size, about 2 hours.
Meanwhile, make the filling. In a large mixing bowl, combine the cream cheese and 1 cup of the confectioner's sugar. Blend by hand or with an electric mixer on low speed. Set aside.
Line a baking sheet with parchment paper.
Turn the dough out onto a lightly floured work surface. Using your fingers, pat it out into a rectangle about 30 inches long and 6 inches wide.
Spread the filling lengthwise over the bottom half of the dough, then flip the top half of the dough over the filling. Seal the edges, pinching the dough together. Shape the dough into a cylinder and place it on the prepared baking sheet seam side down. Shape the dough into a ring and pinch the ends together so there isn't a seam. Insert the king cake baby or pecan half into the ring from the bottom so that it is completely hidden by the dough.
Cover the ring with plastic wrap or a clean kitchen towel and place in a warm, draft-free place. Let the dough rise until doubled in size, about 45 minutes.
Meanwhile, preheat the oven to 350°F.
Brush the top of the risen cake with 2 tablespoons of the milk. Bake until golden brown, 25 to 30 minutes. Remove from the oven and let cool completely on a wire rack.
Make the icing. Combine the remaining 3 tablespoons milk, the lemon juice, and the remaining 3 cups confectioner's sugar in medium-size mixing bowl. Stir to blend well. With a rubber spatula, spread the icing evenly over the top of the cake. Sprinkle with the sugar crystals, alternating colors around the cake.
The cake is traditionally cut into 2-inch-thick slices with all the guests in attendance.
YIELD: 20 to 22 servings
Monday, February 15, 2010
Dreaming of Gardening
"In my garden there is a large place for sentiment. My garden of flowers is also my garden of thoughts and dreams. The thoughts grow as freely as the flowers, and the dreams are as beautiful." (~Abram L. Urban)


Another winter day and No School.....Will this winter ever end.
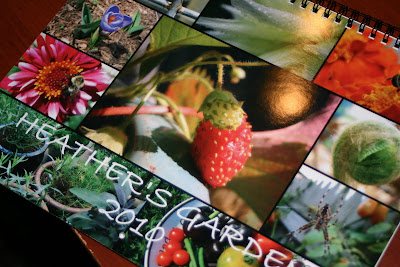
I have been enjoying this Calender full of beautiful garden shots taken by Heather
I have already received some seeds in the mail and am planning on which garden workshops to participate in and which lectures to attend.. but from the view outside my window it is hard to believe that spring will ever be here.


Another winter day and No School.....Will this winter ever end.
I have been enjoying this Calender full of beautiful garden shots taken by Heather
I have already received some seeds in the mail and am planning on which garden workshops to participate in and which lectures to attend.. but from the view outside my window it is hard to believe that spring will ever be here.
Sunday, February 14, 2010
Recipes to Try
Carrot Casserole
2 quart casserole
2 lbs. of baby carrots
1 bell pepper [any color]
1 can Cream of Celery soup
1/3 cup Ranch dressing
2 Cups Shredded Mild Cheddar Cheese
Croutons - enough to make at least ½ cup after being finely mashed
**Grease casserole with margarine
**Boil baby carrots in water until tender
**Dice pepper into ¼” pieces
**Combine mashed croutons in sauce pan with enough melted margarine to evenly coat
the croutons
**Beat the Cream of Celery soup until smooth; stir in Ranch dressing until the mixture is
combined uniformly
Layer ½ of the ingredients into the casserole in the following order and then repeat:
1] Carrots
2] Diced pepper
3] Soup/dressing mixture
4] Cheddar Cheese
Finally cover with the crumbled croutons.
Bake at 350 F for 25 minutes
Optional
I usually make a ‘star’ centered on top of the croutons with 5 smaller baby carrots and 5
strips of pepper cut the same size with one pointed end. I’ve also used 2 different
colors of peppers [½ of each] and then used both colors to make the ‘star’. I add
enough Ranch dressing to fill the center of the star and finally sprinkle a little shredded
cheddar cheese over the center.
SEVEN LAYER MAGIC BARS
(Makes 24 to 36 bars)
(Prep Time 10 minutes)
½ cup (1 stick) butter or margarine
1 ½ cups graham cracker crumbs
1 (14 oz.) can Eagle Brand Sweetened Condensed Milk (NOT evaporated milk)
1 cup (6 ozs.) butterscotch flavored chips
1 cup (6 ozs.) semi-sweet chocolate chips
1 1/3 cups flaked coconut
1 cup chopped nuts
1. Preheat oven to 350o (325o for glass dish). In 13x9 inch baking pan, melt butter in
oven.
2. Sprinkle crumbs over butter; pour sweetened condensed milk evenly over crumbs.
Top with remaining ingredients in order listed; press down firmly.
3. Bake 25 minutes or until lightly browned. Cool. Chill if desired. Cut into bars.
Store covered at room temperature.
TIP – For perfectly cut cookie bars:
Line entire pan (including sides) with a sheet of aluminum foil first. When bars are
baked, cool; lift up edges of foil to remove from pan. Cut into individual squares. Lift off
of foil.
Mexican Veggie Dip
2 - 15 oz. cans black beans, rinsed and drained.
1 - 14-1/2 oz. can diced Mexican tomatoes
1 - 11 oz. can vacuum-packed corn kernels (I like to use white shoe peg corn)
1 - Bunch of green onions, chopped
Add chopped fresh cilantro. The recipe calls for 1/2 cup - I use much more than that.
3 - Tablespoons red wine vinegar
Hot pepper sauce to taste
In bowl, toss all ingredients. Cover and refrigerate several hours to blend flavors. Serve
with tortilla chips and sour cream if desired.
These recipes are from members of the hosta club
Friday, February 12, 2010
Parent Teacher Conference Dinner Recipes

Here is the menu and a few of the requested recipes from the Spring Teacher Dinners
Chicken and Artichoke Casserole
Bourbon Chicken
Overnight Oriental Salad
Cherry Nut Ice cream
Smoked Meatloaf
Meatball Torte
Creamy Potatoes
Chocolate Cherry Cobbler
Ain't Your Momma's Meat Loaf
Meat Loaf: 1 Tablespoon oil, preferably canola or corn
½ cup minced onion
½ green or red bell pepper, chopped fine
3 garlic cloves, minced
1 teaspoon freshly ground black pepper
1 teaspoon salt
½ teaspoon cumin
1 ¼ pounds ground beef
¾ pound ground pork
1 ½ cups dry bread crumbs
3 Tablespoons sour cream
2 Tablespoons Worcestershire sauce
1 egg
¼ cup stock, preferably beef
1 teaspoon Tabasco or other hot pepper sauce to taste
In a heavy skillet, warm the oil over medium heat. Add the onion, bell pepper, garlic, pepper, salt and cumin and sauté until the vegetables are softened. Spoon the vegetable mixture into a large bowl.
Add the remaining meat loaf ingredients and mix well with your hands. Mound the meat into a smoke-proof loaf pan.
Transfer the loaf to the smoker. Cook for 45 minutes, or until the meat has shrunk away from the sides of the pan. Gently ease the meat loaf out of the pan and place directly onto the cooking grid of the smoker. Continue cooking the meat until the internal temperature reaches 170°F (approximately 1 ½ hours). When about 30 minutes of cooking time remain, apply a barbecue sauce of your choice to the top of the meat loaf.
After removing the loaf from the grill, allow it to sit at room temperature for 10 minutes before slicing and serve warm or refrigerate for later use in sandwiches.
Creamy Potatoes
10 potatoes peeled, cubed and boiled
8 ounce pkg cream cheese softened
8 ounce container French onion Dip
1 tsp garlic salt
2 T butter
Combine first 4 ingredients; mix well. spoon into a greased 2.5 quart casserole dish; dot with butter. Bake, covered, at 350 degrees for 35 to 45 minutes. Serves 10.
Overnight Oriental Salad
6 cups shredded iceberg lettuce
1/4 pound bean sprouts
1 cup sliced water chestnuts
1/2 cup green onions sliced thinly
1 med cucumber thinly sliced
2 (6ounce) pkgs frozen snow pea pods- thawed and patted dry
1 cup spanish peanuts
24 cherry tomatoes, sliced
Dressing:
4 cups Mayo
4 tsp curry powder
2 T sugar
1 tsp ground ginger
Serves 10 to 12
In a shallow 4 qt serving dish, distribute shredded lettuce in an even layer. Top with layers of bean sprouts, water chestnuts, green onions, cucumber, and pea pods.
In a small bowl, stir together all the dressing ingredients. Spread dressing evenly over pea pods, cover dish and refrigerate for as long as 24 hours. To serve, add layers of peanuts and cherry tomato slices. Use a glass serving dish so the layers of this salad can be seen.
Chicken Artichoke Casserole
4 whole chicken breasts or canned chicken
10 ounces frozen artichoke hearts or canned
1/3 cup butter
1/3 cup flour
2 1/2 cups chicken broth
1/4 cup dry white wine
4 cups shredded sharp cheddar cheese
1 cup dry bread crumbs
1 tsp thyme
2 T freshly grated Parmesan cheese
Place Chicken Breasts in a large pot, cover with water and bring to a boil, and simmer 30 minutes. Remove chicken and cut into large chunks- or used canned chicken chopped.
Layer Chicken and artichoke hearts ( cook first if frozen or use canned) in a 9x13 inch baking dish.
In a medium saucepan, melt butter. Blend in flour and gradually add chicken broth. Stir constantly and bring to a boil and cook until thickened. Remove from heat and add wine, cheese, green onion, and Parmesan. Blend until smooth. Pour sauce over chicken and artichokes. In a small bowl, combine bread crumbs, thyme, and 2 T Parmesan. Sprinkle this over the sauce. Bake uncovered at 350 degrees for 25 minutes or until bubbly.
Meatball Torte
SERVINGS: 12
TIME: Prep: 1-1/4 hours + rising Bake: 30 min. Note: For the teacher dinners I used Purchased frozen Meatballs
Ingredients:
* 1 package (1/4 ounce) active dry yeast
* 1/4 cup warm water (110° to 115°)
* 3/4 cup warm milk (110° to 115°)
* 1/4 cup Domino® or C&H® Granulated Pure Cane Sugar
* 1/4 cup shortening
* 1 egg
* 1 teaspoon salt
* 3-1/2 to 3-3/4 cups all-purpose flour
MEATBALLS:
* 1 can (5 ounces) evaporated milk
* 2 eggs, beaten
* 1 cup quick-cooking oats
* 1 cup crushed saltines
* 1/2 cup chopped onion
* 1/2 cup chopped celery
* 2 teaspoons salt
* 2 teaspoons chili powder
* 1/2 teaspoon garlic powder
* 1/2 teaspoon pepper
* 3 pounds ground beef
FILLING:
* 1 can (15 ounces) crushed tomatoes
* 1/2 cup chopped onion
* 1/3 cup grated Parmesan cheese
* 1 teaspoon minced fresh parsley
* 1-1/2 teaspoons dried basil
* 1-1/2 teaspoons dried oregano
* 1 teaspoon salt
* 1-1/2 cups (6 ounces) shredded part-skim mozzarella cheese
Directions:
In a large bowl, dissolve yeast in warm water. Add the milk, sugar, shortening, egg, salt and 2 cups flour. Beat until smooth. Stir in enough remaining flour to form a soft dough.
Turn onto a floured surface; knead until smooth and elastic, about 6-8 minutes. Place in a greased bowl, turning once to grease the top. Cover and let rise in a warm place until doubled, 1 to 1-1/2 hours.
In a large bowl, combine the milk, eggs, oats, saltines, onion, celery and seasonings. Crumble beef over mixture and mix well. Shape into 1-1/2-in. balls. In a large skillet over medium heat, cook meatballs in batches until no longer pink.
Meanwhile, place tomatoes and onion in a small saucepan. Bring to a boil. Reduce heat; simmer, uncovered, for 10 minutes or until slightly thickened. Stir in the Parmesan cheese, herbs and salt.
Punch dough down. Divide into three portions. Roll two portions into 11-in. circles; line the bottoms and press partially up the sides of two greased 9-in. springform pans. Roll third portion into a 12-in. x 10-in. rectangle; cut into twelve 10-in. x 1-in. strips.
Place meatballs in prepared crusts; top with tomato mixture and mozzarella cheese. Make a lattice crust with strips of dough; trim and seal edges. Cover and let rise for 30 minutes. Bake at 350° for 30-35 minutes or until golden brown. Cut into wedges.
Yield: 2 tortes (6 servings each).
Bourbon Chicken
1 pound Chicken legs or Thighs
4 ounces Soy Sauce
1/2 cup brown sugar
1/2 tsp Garlic powder
1 tsp powdered Ginger
2 T dried minced onion
1/2 cup Bourbon Whiskey
2 Tsp white wine
Mix all the marinade ingredients and pour over chicken pieces in a bowl. Cover and refrigerate - stirring often- for several hours- best overnight. Bake chicken at 350 degrees for one hour in a single layer, basting every 10 minutes. Remove Chicken. Scrape pan juices with all the brown bits into a frying pan. Heat and add 2 T White wine. Stir and add Chicken. Cook for 1 minute and serve.
Cherry Chocolate Cobbler
Serves/Makes: 6
Ingredients:
1 1/2 cup flour
1/2 cup sugar
2 teaspoons baking powder
1/2 teaspoon salt
1/4 cup butter
1 (6 oz.) pkg. semisweet chocolate morsels
1/4 cup milk
1 egg
1 (21 oz.) can cherry pie filling
1/2 cup nuts, finely chopped
Directions:
Preheat oven to 350F.
In large bowl, combine flour, sugar, baking powder, salt and butter; cut with pastry blender until crumbs are size of large peas. Melt over hot (not boiling) water, Nestle's semisweet chocolate morsels. Remove from heat and cool slightly at room temperature (about 5 minutes). Add milk and egg to melted chocolate and mix well. Blend chocolate into flour mixture. Spread cherry pie filling in bottom of 2-quart casserole. Drop chocolate batter randomly over cherries.
Sprinkle with chopped nuts. Bake at 350F for 40 - 45 minutes. Serve warm with heavy cream.
Thursday, February 11, 2010
Skunk Valentine Cookies: Love Stinks


Quinn did not want any Mushy or Lovey or anything like that for his Valentines this year. I had made up a cute lion tag with the words "Wild for You" on it to go with Lion Cookies; but he really did not like the "Wild about You" saying- He wanted just Happy Valentine's Day thats it. So last night I thought of Skunks and asked him if Love Stinks would work and he said Ok so thats what he got.


Thursday, February 04, 2010
Baking: Artisan Bread in Five Minutes a Day

I am anxious to try making this bread. I was happy to try some that a friend made for the teacher dinners yesterday. The book that this bread comes from is very popular.
The Master Recipe:
Boule (Artisan Free-Form Loaf)
Makes four 1-pound loaves. The recipe is easily doubled or halved.
* 3 cups lukewarm water
* 1-1/2 tablespoons granulated yeast (1-1/2 packets)
* 1-1/2 tablespoons kosher or other coarse salt
* 6-1/2 cups unsifted, unbleached, all-purpose white flour,
measured with the scoop-and-sweep method
* Cornmeal for pizza peel
Mixing and Storing the Dough
1. Warm the water slightly: It should feel just a little warmer than body temperature, about 100°F. Warm water will rise the dough to the right point for storage in about 2 hours. You can use cold tap water and get an identical final result; then the first rising will take 3 or even 4 hours. That won't be too great a difference, as you will only be doing this once per stored batch.
2. Add yeast and salt to the water in a 5-quart bowl or, preferably, in a resealable, lidded (not airtight) plastic food container or food-grade bucket. Don't worry about getting it all to dissolve.
Boule
3. Mix in the flour—kneading is unnecessary: Add all of the flour at once, measuring it in with dry-ingredient measuring cups, by gently scooping up flour, then sweeping the top level with a knife or spatula; don't press down into the flour as you scoop or you'll throw off the measurement by compressing. Mix with a wooden spoon, a high-capacity food processor (14 cups or larger) fitted with the dough attachment, or a heavy-duty stand mixer fitted with the dough hook until the mixture is uniform. If you're hand-mixing and it becomes too difficult to incorporate all the flour with the spoon, you can reach into your mixing vessel with very wet hands and press the mixture together. Don't knead. It isn't necessary. You're finished when everything is uniformly moist, without dry patches. This step is done in a matter of minutes, and will yield a dough that is wet and loose enough to conform to the shape of its container.
Allow to rise: Cover with a lid (not airtight) that fits well to the container you're using. Do not use screw-topped bottles or Mason jars, which could explode from the trapped gases. Lidded plastic buckets designed for dough storage are readily available (see page 14 of the book). Allow the mixture to rise at room temperature until it begins to collapse (or at least flattens on the top), approximately 2 hours, depending on the room's temperature and the initial water temperature. Longer rising times, up to about 5 hours, will not harm the result. You can use a portion of the dough any time after this period. Fully refrigerated wet dough is less sticky and is easier to work with than dough at room temperature. So, the first time you try our method, it's best to refrigerate the dough overnight (or at least 3 hours), before shaping a loaf.
The scoop-and-sweep method gives consistent results without sifting or weighing. It's easier to scoop and sweep if you store your flour in a bin rather than the bag it's sold in; it can be hard to get the measuring cups in a bag without making a mess. Also: Don't use an extra-large 2-cup-capacity measuring cup, which allows the flour to overpack and measures too much flour.
Relax! You do not need to monitor doubling or tripling of volume as traditional recipes.
Boule
On Baking Day
5. The gluten cloak: don't knead, just "cloak" and shape a loaf in 30 to 60 seconds. First, prepare a pizza peel by sprinkling it liberally with cornmeal (or whatever your recipe calls for) to prevent your loaf from sticking to it when you slide it into the oven.
Sprinkle the surface of your refrigerated dough with flour. Pull up and cut off a 1-pound (grapefruit-size) piece of dough, using a serrated knife. Hold the mass of dough in your hands and add a little more flour as needed so it won't stick to your hands. Gently stretch the surface of the dough around to the bottom on all four sides, rotating the ball a quarter-turn as you go. Most of the dusting flour will fall off; it's not intended to be incorporated into the dough. The bottom of the loaf may appear to be a collection of bunched ends, but it will flatten out and adhere during resting and baking. The correctly shaped final product will be smooth and cohesive. The entire process should take no more than 30 to 60 seconds.
6. Rest the loaf and let it rise on a pizza peel: Place the shaped ball on the cornmeal-covered pizza peel. Allow the loaf to rest on the peel for about 40 minutes (it doesn't need to be covered during the rest period). Depending on the age of the dough, you may not see much rise during this period; more rising will occur during baking ("oven spring").
7. Twenty minutes before baking, preheat the oven to 450°F, with a baking stone placed on the middle rack. Place an empty broiler tray for holding water on any other shelf that won't interfere with the rising bread.
8. Dust and slash: Unless otherwise indicated in a specific recipe, dust the top of the loaf liberally with flour, which will allow the slashing knife to pass without sticking. Slash a 1/4-inch-deep cross, "scallop," or tic-tac-toe pattern into the top, using a serrated bread knife (see photo).
Boule
9. Baking with steam: After a 20-minute preheat, you're ready to bake, even though your oven thermometer won't yet be up to full temperature. With a quick forward jerking motion of the wrist, slide the loaf off the pizza peel and onto the preheated baking stone. Quickly but carefully pour about 1 cup of hot water from the tap into the broiler tray and close the oven door to trap the steam. Bake for about 30 minutes, or until the crust is nicely browned and firm to the touch. Because you've used wet dough, there is little risk of drying out the interior, despite the dark crust. When you remove the loaf from the oven, it will audibly crackle, or "sing," when initially exposed to roomtemperature air. Allow to cool completely, preferably on a wire cooling rack, for best flavor, texture, and slicing. The perfect crust may initially soften, but will firm up again when cooled.
10. Store the remaining dough in the refrigerator in your lidded (not airtight) container and use it over the next 14 days: You'll find that even one day's storage improves the flavor and texture of your bread. This maturation continues over the 14-day storage period. Refrigerate unused dough in a lidded storage container (again, not airtight). If you mixed your dough in this container, you've avoided some cleanup. Cut off and shape more loaves as you need them. We often have several types of dough storing in the refrigerator at once. The dough can also be frozen in 1 pound portions in an airtight container and defrosted overnight in the refrigerator prior to baking day.
VARIATION: HERB BREAD. This simple recipe shows off the versatility of our approach. Herb-scented breads are great favorites for appetizers and snacks.
Follow the directions for mixing the Boule dough and add 1 teaspoon dried thyme leaves (2 teaspoons fresh) and 1/2 teaspoon dried rosemary leaves (1 teaspoon fresh) to the water mixture.
You can also use herbs with the other bread recipes in this chapter.
Boule
What's a "gluten-cloak"? Just imagine a warm blanket being pulled around you on a cold night. Or, for the more technically inclined: What you are trying to do here is to add enough flour to the surface so it can be handled and the protein strands in the surface can be aligned, creating a resilient "cloak" around the mass of wet, barely kneaded dough. Visualize a cloak being pulled around the dough, so that the entire ball is surrounded by a skin. Resist the temptation to get rid of all stickiness by adding too much flour. Adding large amounts of flour prevents the bread from achieving a finished crumb with the typical artisanal "custard" (page 19 of the book).
Lazy sourdough shortcut: When your dough bucket is finally empty, don't wash it! Immediately re-mix another batch in the same container. In addition to saving the cleanup step, the aged dough stuck to the sides of the container will give your new batch a head start on sourdough flavor. Just scrape it down and it will hydrate and incorporate into the new dough.
Amaze your friends with the "6-3-3-13" rule: If you want to store enough for eight one-pound loaves, here's a simple mnemonic for the recipe: 6, 3, 3, and 13. It's 6 cups water, 3 tablespoons salt, 3 tablespoons yeast, and then add 13 cups of flour. Store in a 10-quart lidded container. That's it. It will amaze your friends when you do this in their homes without a recipe—but tell them to buy this book anyway!
* from:
Artisan Bread in Five Minutes a Day
The Discovery That Revolutionizes Home Baking
Monday, February 01, 2010
Enjoying Back yard Birds


GREAT BACKYARD BIRD COUNT
This weekend our yard was full of flocks of Robins- a sign perhaps that spring will be here some day. There have also been many woodpeckers and flickers visiting.
Across North America, thousands of people of all ages and backgrounds are contributing to the study of birds through the Cornell Lab of Ornithology’s citizen-science programs. Participants and scientists have joined in a powerful partnership to gather and synthesize information to better understand and protect birds and their habitats.
You too can help by taking part in the annual Great Backyard Bird Count, February 12 - 15. This citizen scientist project compiles bird counts from across the continent to create a winter snapshot of bird populations. You decide how long to watch during one or all of the four count days. Enter your data on-line, then view maps, graphs, and summaries, and find out what scientists are learning from the results.
There is no registration or fee. For more information go to
http://www.birdsource.org/gbbc/howto.html
COURTSHIP FACTS
February is the month for lovers and, even though it is still winter, many birds are already beginning their mating rituals.
Brightly colored songbirds apparently rely more upon their bright plumage to attract female mates as their displays are much more subtle than birds with less coloring.
Female woodpeckers are attracted to males that make loud drumming noises -- the louder the better.
Female birds require one-third more food than normal during the mating season to form their eggs. This often comes courtesy of the male. Many species can be observed “mate feeding” or “courtship feeding”. Be sure to keep your feeders filled during the spring months as natural food is in short supply during this time of the year.
If the male of a species has coloration that is distinctively different from the female’s, the male is much less likely to share equally in nest building, incubation and care of the young. Brightly colored males could endanger their young by drawing attention to them. The cardinal is one exception to this as the male often cares for the first brood of nestlings while the female lays and incubates a second clutch.
Male birds rarely build nests, except as part of a courtship display. Female birds do most of the real nest building.
Cold or dry weather can retard the sexual responsiveness of birds but rainy weather doesn’t seem to have any effect on them.
Red-tailed hawks are often seen in pairs this time of year. The pairs will sometimes fly spiraling higher and higher, then lock talons and come spinning back towards the ground in a strange sort of mating dance.
Owls can be heard calling back and forth. If you hear an owl calling, listen to see if you can hear another owl a distance away. Great horned owls are one of our earliest nesters and are already sitting on eggs.
“Go to the winter woods: listen there, look, watch, and the ‘dead months’ will give you a subtler secret than any you have yet found in the forest”
--Fiona Maclead (1855-1905), English writer
Information from the backyard chatter newsletter
Subscribe to:
Posts (Atom)