Wednesday, December 24, 2014

Grandma Kay's Candy Cane Cookies


1 cup shortening/Butter Mix
1 cup sifted Powdered Sugar
1 Egg
1 1/2 tsp almond extract
1 tsp vanilla
2 1/2 cups flour
1 tsp red food coloring
1/2 cup crushed peppermint candy
1/2 cup sugar


Heat oven to 375 degrees.  Mix shortening and butter with powdered sugar, egg, and flavorings.
Measure Flour by sifting. Mix Flour and Salt; Stir into shortening mixture.  Divide Dough in half.
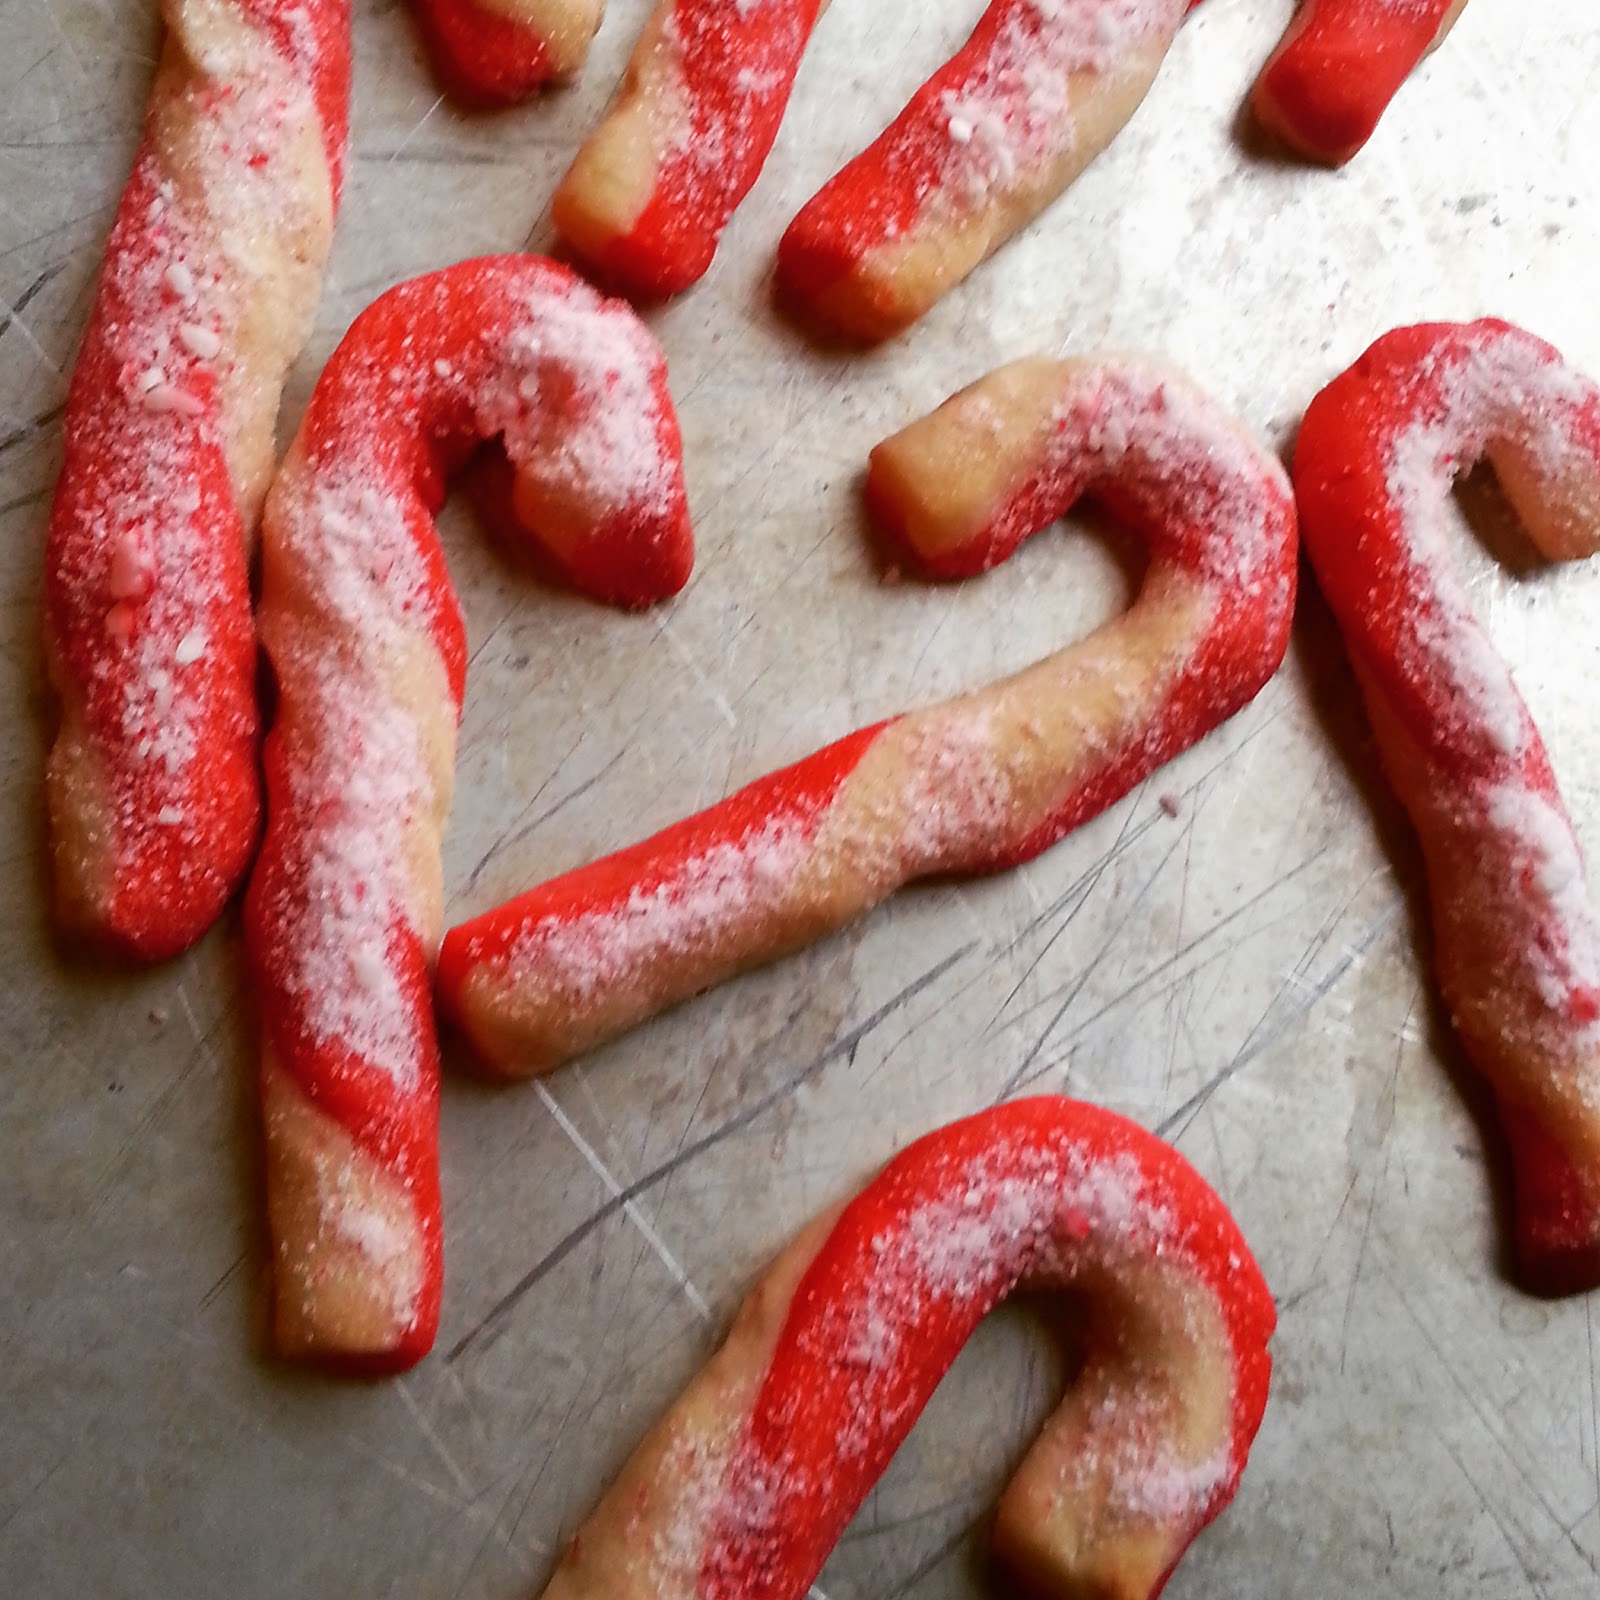
Blend Food coloring into one half.  Toll a 4 inch strip  from each color.  For Smooth, even strips, roll them back and forth on a lightly floured board.  Place strips side by side, press lightly together and twist like a rope.  For best results, complete cookies one at a time..Place on ungreased baking sheet. Curve top to form handle of cane.
Bake about 9 minutes, until lightly browned.  While still warm sprinkle with mixture of candy and sugar.  Makes about 4 dozen.

Friday, December 05, 2014

Creating ClothesPin Christmas Trees

I love These Trees~ inspired by Pottery Barn... Great for Displaying Christmas Cards, a Collection of Vintage Postcards or antique ornaments and of Course as an Advent Tree to count down the Days until Christmas.....  I will be hosting my second  Clothespin Christmas Tree workshop this evening using all Miss Mustard Seed's Milk Paint Products and CREATIVITY!!


https://www.facebook.com/pages/Simply-Home-Sweet-Home/306647762682894?ref=br_rs

Poor Man's Toffee

Tuesday, September 30, 2014

Love These Chocolate Chunk Blondies


Ingredients
1/2 pound (2 sticks) unsalted butter, at room temperature
1 cup light brown sugar, lightly packed
1/2 cup granulated sugar
2 teaspoons pure vanilla extract
2 extra-large eggs, at room temperature
2 cups all-purpose flour
1 teaspoon baking soda
1 teaspoon kosher salt
1 1/2 cups chopped walnuts
1 1/4 pounds semisweet chocolate chunks or semisweet chocolate chips
Directions
Preheat the oven to 350 degrees. Grease and flour an 8 x 12 x 2 inch baking pan.

In the bowl of an electric mixer fitted with the paddle attachment, cream the butter, brown sugar, and granulated sugar on high speed for 3 minutes, until light and fluffy. With the mixer on low, add the vanilla, then the eggs, one at a time, and mix well, scraping down the bowl. In a small bowl, sift together the flour, baking soda and salt and with the mixer still on low, slowly add flour mixture to the butter mixture. Fold the walnuts and chocolate chunks in with a rubber spatula.

Spread the batter into the prepared pan and smooth the top. Bake for 30 minutes exactly. Don't overbake! A toothpick may not come out clean. Cool completely in the pan and cut into bars.

A wonderful Barefoot Contessa Recipe

Monday, February 10, 2014

Fragrant Cinnamon Hearts to use as Sweet Little Scented Gift Tags.


Love the Beautiful Colors of Miss Mustard Seed's Milk Paint I Created a few Cinnamon dough Hearts ready to string for sweet little Valentine's Day Tags
#simplyhomesweethome
#mmsmilkpaint
#iheartmilkpaint
#valentine'sDayCrafts


Cinnamon Dough Recipe:

Ingredients:
3 Cups Flour
1 Cup Salt
1 Cup Cinnamon
1 Cup Nutmeg
1- 2 1/2 Cups of Warm Water

Directions:
1. Mix dry ingredients in a large bowl. 
2. Add in the water a little at a time, keep adding water and mixing well until the dough is formed.
3. Roll the dough to desired thickness and begin cutting out shapes with a cookie cutter. Recommend to Roll out dough between waxed paper until thickness is 1/8 to 1/4 inch 

Create: 
Place ornaments on an ungreased baking sheet and use a straw to make holes for hanging the ornaments. 

Bake for 1 1/2 hours at 225 degrees. Place on a wire rack and return to the over for another 1 1/2 hours to ensure the ornaments are completely dry on the bottom.

Let sit and cool, then decorate. 

I painted my Cinnamon Hearts with Milk Paint.  It sticks well to the hearts and then Crackles for a nice Rustic look.  The Milk Paint does not smell so it allows the Cinnamon Scent to remain Nice and Fragrant.  


How To Make Bath Bombs- A Sweet Little Gift for your Valentine


Basic Bath Bomb Recipe

Dry ingredients:
  1 cup baking soda (sodium bicarbonate)
  ½ cup citric acid - Sifted
  ½ cup corn starch
  dry herbs or flowers (optional)

Wet ingredients:
  2 ½ tablespoons sweet almond oil
  ¾  tablespoon water
  ¼ - 1 teaspoon of essential or fragrance oil
  

3-dimensional mold or deep dish style soap mold
squirt bottle with witch hazel or water

~    ~    ~    ~    ~    ~    ~    ~    ~    ~    ~    
Mix all the dry ingredients together and set aside.  Mix the wet ingredients in an old jar with a lid so they can be shaken well.  Slowly pour the wet ingredients into the dry and mix with your hands.  The citric acid my start to fizz, so pour slowly and work the liquid in as you go.  The mixture should be damp enough to hold together.  If needed, mist with witch hazel or water.  Work fast to press the mixture into the molds.  If you're using a 2-part sphere, fill each side and then press together.   Let bombs dry in the mold for a few hours.  Larger spheres may need more drying time.  Remove from mold and let dry for 1 week before use...

Friday, February 07, 2014

Milk Painting Canning Jars


I Love Painting the Simple But oh So useful Mason Jar... Great for Gift Giving filled with Flowers or Treats.

I painted these jars with Miss Mustard Seed Milk Paint... I wanted a Charming Pink Color.
I mixed equal parts Ironstone and Tricycle and added a little bit of Shutter Gray  until the color was Just Right:  I am calling it So Sweet Pink..

I like to paint Jars to use up the left over paint from bigger projects.  I hate to waste the paint so these are perfect for that..

Now, How to get that Milk Paint to Stick to a Glass Mason Jar?

I first Spray paint the outside of the Jar. I use the cheapest white flat spray paint usually the $1 a can white Spray paint. Lightly Spray the outside of the glass jar a fine even coat.  Then let dry.  Sand lightly.

Next, Mix up your milk paint.. Add equal parts bonding agent. now paint your jar.   I Let the paint dry overnight.  The Milk Paint will just completely flake off the glass jar with with out the added bonding agent.

Now the Fun Part- Distress the jar lightly with fine sand paper to remove a little paint here and there .
I then Highlight the jar details with a Walnut Distressed ink pad.

To make the Jar's finish more durable. Spray lightly with a Clear Coat Shellac..

I embellished with bits and Pieces of Vintage Lace, Cute little tags,  and my homemade Cinnamon Hearts that I also painted with Milk Paint..


www.simplyhomesweethome.com
or Facebook: simplyhomesweethome


https://www.facebook.com/pages/Simply-Home-Sweet-Home/306647762682894

Wednesday, January 29, 2014

Making Sunburst Cards


I have been working on organizing my Craft Room and Found so many Paper Scraps laying around.  I put them in a box and nearly threw them away.  I have been seeing all these fabulous cards out there Called "Sunburst" cards and thought it would be a great way to use up all those papers.
They are a fast  ( if you have all you paper cut up) and Fun way to make a variety of cards.

We will be making PostCard ones today with 4-H kids...  That way they can glue the scrap pieces onto a postcard without having to have had to precut a bunch of card stock.

To start cut up all your paper scraps into 1 1/2 inch x 4 inch pieces:


To make these cards:

Base of Card:  5 inch Card Base- Kraft card stock cut into 5" x 10" and Folded

Scallop Die cut Circle , Trim, flowers, and pearls:  Could use any embellishment


CARD 1:

4 patterned paper rectangle cut into  1 1/2" x 4"

Cut each rectangle in half to make 8 triangles

1 scrap piece of card stock cut to 3 1/2" x 5"

Mark the  Center Point on the  Cardstock and Glue 8 triangles lined up against each other starting at the Center point

I use a glue stick and paste the entire Card stock rectangle.

Now the Fun Part:  Trim all pieced of paper that hang over the Card stock rectangle.

That it now you can create your Card by Adhering it to the 5inch Card Base and Embellish as you wish.


CARD 2:

1 Scrap piece of card stock cut to 2 3/4" x 5"

IF using this size of base:  use 18 rectangles

Follow directions as for Card  1


For a little Texture- I ran a few of the Sunburst pieces in an embossing folder through my sizzix die cut machine.

Sunday, January 26, 2014

Bridal Shower Cookies and a Cookie Decorating Class


I had a Wonderful Time Demonstrating a Cookie Decorating Lesson at a Bridal Shower Last Weekend.  I wish I would have taken better photos.  Everything was so Beautiful... From the Home to the Food to the people....


Baby Shower Cookies~ Elephants and onesies


Friday, January 24, 2014

Busy Painting And Crafting I love Red Chairs !

I love the Miss Mustard Seed Tricycle Red Milk Paint on this Antique Chair.  I distressed it and used lots MMS Antique Wax on it to give it a more Rustic Red.  Busy Crafting with Burlap and Coffee Filters!  


Friday, January 17, 2014

Jicama Fries and Restaurant-Style Salsa


Ultra easy fries made of raw jicama, a tuberous root that’s really similar to a turnip (but way tastier).
Ingredients
  • 1 jicama, skin removed and sliced into thin strips
  • ½ tsp extra-virgin olive oil
  • 1 tsp paprika
  • ½ tsp onion powder
  • pinch salt
  • pinch cayenne, optional
Instructions
  1. Toss all ingredients together in a large bowl until fries are well coated. Enjoy!

  2. For a baked option, bake at 400F for a total of 25 minutes, rotating halfway through.
Notes
For the paprika, you could try smoked paprika if you’re not too fond of spice. Otherwise, use ½ tsp to ¾ tsp if you don’t want it too spicy.


Restaurant-Style Salsa
Ingredients
Two 10-ounce cans diced tomatoes and green chiles, such as Rotel
One 28-ounce can whole tomatoes with juice
1/2 cup fresh cilantro leaves (or more to taste!)
1/4 cup chopped onion
1 clove garlic, minced
1 whole jalapeno, quartered and sliced thin, with seeds and membrane
1/4 teaspoon ground cumin
1/4 teaspoon salt
1/4 teaspoon sugar
1/2 whole lime, juiced
Directions
Combine the diced tomatoes, whole tomatoes, cilantro, onions, garlic, jalapeno, cumin, salt, sugar and lime juice in a blender or food processor. (This is a very large batch. I recommend using a 12-cup food processor, or you can process the ingredients in batches and then mix everything together in a large mixing bowl.)

Pulse until you get the salsa to the consistency you'd like. I do about 10 to 15 pulses. Test seasonings with a tortilla chip and adjust as needed.

Refrigerate the salsa for at least an hour before serving.


Read more at: http://www.foodnetwork.com/recipes/ree-drummond/restaurant-style-salsa-recipe/index.html?oc=linkback

Wednesday, January 15, 2014

Homemade Applesauce with Coconut Sugar: Cinnamon

Homemade Applesauce with Coconut Sugar: Sage & Cinnamon
Made this Today with a bunch of
assorted apples... Tastes Great and made the house smell awesome

Doing a Little Painting and Loving Lucketts Green MMS Milk Paint

I found these sweet Framed Vintage Needle Work.  I did not like the color of the frames so I painted them.  Freshened them up and Now they look Ready For Spring.

https://www.facebook.com/pages/Simply-Home-Sweet-Home/306647762682894

Saturday, January 11, 2014

Thai Coconut Soup


Tom Kha Gai {Thai Coconut Soup}
 Print
Author: 
Serves: 4
Ingredients
  • ½ tablespoon coconut oil
  • ⅛ teaspoon Thai dried chiles, finely ground*
  • ½ cup chicken stock
  • 2 cans full fat coconut milk
  • 2 inch piece of Galangal, skin on and thinly sliced (fresh Ginger will work too)*
  • 1 stalk lemon grass, sliced diagonally into 3-4 pieces and slightly bruised/flattened with a mallet or butt of a knife*
  • kaffir lime leaves*
  • 4 tablespoons fish sauce
  • 2 cups chicken breast, very thinly sliced
  • 1 cup white button mushrooms, sliced
  • 2 tablespoons lime juice
  • ½ tablespoon coconut sugar (honey will work too, but coconut sugar will taste the most authentic)
  • 8 cherry tomatoes, sliced in half
  • fresh cilantro and scallions for serving
  • *All of the starred items can be purchased dried in a jar by the brand Thai Kitchen
Instructions
  1. Melt the coconut oil in a soup or stock pot, then add the ground chiles and stir for 1-2 minutes until fragrant.
  2. Pour in the coconut milk and bring to boil. Add the chicken stock, galangal, lemon grass, kaffir leaves, fish sauce, and chicken and simmer for 10 minutes until the chicken is cooked through.
  3. Add the mushrooms, lime juice, coconut sugar, tomatoes and simmer for another 5 minutes until the vegetables are tender but not mushy.
  4. Serve with fresh cilantro and scallions.

Friday, January 10, 2014

Great Grain-Free Eggplant Parmesan Recipe


Eggplant parmesan breaded in coconut flour with healthy grain free sauce!
Author: 
Recipe type: Main
Cuisine: Italian
Serves: 4-6
Ingredients
  • 2-3 medium sized eggplants
  • salt
  • about ½ cup coconut flour (or almond flour)
  • ⅓ cup arrowroot powder (can use more coconut if you don’t have this)
  • garlic, salt, pepper and basil leaf
  • 3-4 eggs
  • 1 TBSP heavy cream (optional)
  • 1 jar (24 ounces) of pasta sauce (check ingredients!)
  • Parmesan cheese
  • Mozzarella cheese
  • tallow, lard or coconut oil
Instructions
  1. About an hour before preparing, peel eggplant and slice into ¼ to ½ inch slices. Place eggplant in strainer and sprinkle heavily with salt. Let sit for 45 mins to 1 hour. This sweats the eggplant and makes it much less bitter. Rinse well with water and pat dry
  2. Put lard, tallow or coconut oil (about 1-2 cups) in a large skillet and turn on medium heat.
  3. Preheat oven to 350 degrees
  4. Mix coconut flour, arrowroot, 2 T parmesan and spices in large bowl or on a large plate
  5. Beat eggs with heavy cream, if using
  6. Dip eggplant in egg mixture, then in coconut flour mixture and place in hot oil in skillet
  7. Cook approximately 4 minutes per side until browned
  8. As eggplant is finished, place in a 13×9 baking dish
  9. Pour pasta sauce over the eggplant and then top with parmesan and mozzarella, if desired
  10. Heat in oven until cheese is melted and sauce is heated.

You May also like

Related Posts with Thumbnails