Thursday, July 31, 2008
Making; Lemon Ice Cream with Strawberry Sauce and Cornmeal Sandies
Recipes adapted from Better Homes and Gardens:
Lemon Ice Cream with Strawberry Sauce
Prep: 20 min.
Chill: 4 hrs.
Freeze: according to manufacturer directions
Ingredients
* 5 to 6 lemons
* 2 cups milk
* 1-1/4 cups granulated sugar
* 1/4 tsp. salt
* 12 egg yolks
* 2 cups whipping cream
* Strawberry Sauce (see recipe)
Directions
1. Finely shred 2 tablespoons peel from lemons. Squeeze juice to equal 3/4 cup. Set aside peel; cover and refrigerate juice.
2. In small saucepan heat milk over medium heat just until tiny bubbles begin to appear around the edge of the saucepan.
3. In large saucepan whisk sugar, salt, and lemon peel into egg yolks until well blended. Gradually whisk in warmed milk. Cook and stir continuously with a wooden spoon or heatproof rubber spatula over medium heat until mixture thickens and coats the back of a clean metal spoon, about 15 minutes (do not boil). Remove pan from heat. Transfer mixture to large bowl. Quickly cook by placing the bowl of custard in a very large bowl of ice water for about 5 to 7 minutes, stirring constantly. Once completely cool, stir in whipping cream. Cover and chill 4 to 24 hours.
4. Just before freezing stir in lemon juice. Strain through fine-mesh strainer; discard peel. Freeze in 4- or 5-quart ice cream freezer according to manufacturer's directions. If desired, ripen 4 hours. Serve with Blueberry Sauce. Makes about 7 cups. Each 1/2-cup serving.
Strawberry Sauce: In saucepan combine 1/3 cup sugar, 1/2 teaspoon cornstarch and 1/4 teaspoon salt; stir in 1/4 cup water and 1 teaspoon lemon juice and mix well. Add 2 cups fresh strawberries stems removed and quartered. Cook over medium heat, stirring often, until mixture is slightly thickened and bubbly. Cook and stir 2 minutes more.
Transfer to bowl; cool. Serve at room temperature. Or cover and refrigerate 1 hour or up to 2 days. If chilled, let stand at room temperature 30 minutes before serving. Makes 2 cups.
Cornmeal Sandies
Prep: 30 min.
Chill: 2 min.
Bake: 10 min. per batch
Cool: 2 minutes per batch
Stand: 2 minutes per batch
Ingredients
* 1 cup butter, softened
* 1/4 cup sugar
* 3 tsp. finely shredded orange peel
* 2 tsp. finely shredded lemon peel
* 1 tsp. vanilla
* 1-1/2 cups unbleached all-purpose flour
* 1/2 cup yellow cornmeal
* 1/4 tsp. salt
* Sugar
Directions
1. Preheat oven to 350 degrees F. Line baking sheets with parchment paper. Set aside.
2. In large mixing bowl beat butter with electric mixer on medium to high speed for 30 seconds. Beat in the 1/4 cup sugar, and fruit peels; beat in vanilla.
3. In separate bowl combine flour, cornmeal, and salt; gradually add to and mix with butter mixture until a cohesive ball of dough forms.
4. Using a 1-ounce scoop or tablespoon, roll dough in 3/4-inch balls. Place 1 inch apart on prepared baking sheets. Flatten slightly with palm of hand.
5. Bake 10 to 12 minutes, until edges are lightly browned. Cool 2 minutes on baking sheet. Place additional sugar in shallow dish; gently toss warm cookies in sugar. Cool on rack. Makes 3 dozen cookies.
Basil Recipes: Shrimp, Tomato, and Basil Pasta
I am looking for new dinner recipes that call for fresh basil. I have lots of it to use right now. This was a quick-to-make recipe great for summer. I used frozen shrimp that I quickly thawed by running under cold water. I loved the combination of fresh tomatoes and canned tomatoes together. The recipe comes from Martha Stewart everyday food.
1 1/2 pounds medium shrimp, peeled and deveined and tails removed
course salt and fresh ground pepper
6 tsp olive oil
2 garlic cloves, minced
1 can 14.5 -ounce diced tomatoes in juice
1 pint cherry tomatoes or grape tomatoes halved
1/2 pound linguine
1 1/2 cups lightly packed fresh basil, leaves torn into small pieces plus extra for garnish
1. Season the shrimp with salt and pepper. In a large skillet, heat 4 tsp of the oil over high heat. Add the shrimp. cook until opaque throughout, turning occasionally, about three minutes. Transfer to a bowl; set aside.
2. Make the sauce: To the same skillet, add the remaining 2 tsp oil and the garlic; cook over medium heat until fragrant, about 30 seconds. Add the canned tomatoes and their juice, along with 2 cups water; bring to a boil. Reduce the heat; simmer, stirring occasionally, until the tomatoes have softened and are saucy, about 15 minutes. Remove the sauce from the heat; stir in the cherry tomatoes.
3. Meanwhile, in a large pot of boiling salted water, cook the pasta until al dente according to the package directions. Drain, return the pasta to the pot. Add the tomato sauce, shrimp, and basil; season with salt and pepper, and toss. Serve immediately, garnish with basil leaves, if desired.
Monday, July 28, 2008
Gardening Tip: Dig out and destroy purple coneflowers with "aster yellow " Disease
Aster Yellows is a common disease that affects many ornamental flowers. Susceptible plants include asters, chrysanthemum, coreopsis, cosmos, echinacea (coneflowers), dianthus, gladiola, marigold and petunias. Vein clearing, or loss of green pigment within the veins, is often the first symptom. Stunting, stiff extra bushy yellow growth, deformed or poorly developed flowers which remain green are all common symptoms. There is no cure for infected plants. Remove and discard them to reduce further spread.
I learned something about those funny looking purple coneflower plants that I have randomly growing in the garden. At the Master Garden plant diagnostic clinic last Friday, there was a table with the same funny looking Echinacea plants that I have growing at home. Fortunately, I have already been getting rid of them when I see them. The plants have what is called aster yellow and should be dug out of the garden and thrown into the garbage so this does not spread to the other cone flowers or other plants. So today, I went around and removed about 3 large plants with the distorted aster like flowers and threw them in the garbage.
Here is some info that I found describing this disease:
Purple cone flowers display some of the most dramatic evidence of this non-fatal, but potentially prolific disease. Secondary flower heads emerging from primary flowers can be a common sight. However, Aster Yellows is a disease that affects over 300 species of plants including herbaceous ornamentals, vegetables and even weeds.
Infected plants can serve as the starting place for the spread to other non-infected plants. The source of the problem is a bacteria-like microscopic organism known as a phytoplasma. A tiny insect known as a leafhopper most commonly spreads it. As the leafhopper feeds on infected plants, it is taking in this phytoplasma through the plant sap. Once inside the insect’s body, the disease organisms multiply rapidly. Eventually, the phytoplasma is then reintroduced as the leafhopper feeds on healthy plants.
Symptoms of Aster Yellows develop most quickly and are more severe when temperatures are warm. In cooler temperatures, plants may be infected without any visible indication. Unique symptoms also vary between plant types. Symptoms common to most infected plants include yellow foliage, stunted growth, flowers that remain on the green side, and an overall distorted look.
Controlling Aster Yellows is challenging. There is no known cure for the disease, and chemical control of the vectoring leafhopper is usually not effective and therefore not recommended. The best means of control for this problem, as well as many other garden diseases is good sanitation. Remove and destroy any infected plants you see immediately. This includes all weeds, since they can be a common host source for this disease.
Lastly, not all plants are susceptible to the disease. Most woody shrubs seem to avoid the problem as well as a few herbaceous plants such as salvia, geraniums and impatiens. Choosing resistant plants and removal of infected plants are the best control methods for controlling Aster Yellows in the home landscape.
This info was found here
Quinn and his Caterpillars
Quinn has been collecting fuzzy brown caterpillars and keeping them in a box in the garage is constantly looking for things for their "habitat" as he calls it. He wants to know what kind of moth these will turn into.
Here is some infor from the Milkweed Cafe about woolly bear caterpillars:
Raising Woolly Bear Caterpillars
The true woolly bear, sometimes called woolly worm, is the caterpillar stage of the Isabella tiger moth, Pyrrharctia isabella.
This moth is found throughout the United States and in parts of Canada and Mexico.
The fuzzy woolly bear caterpillars eat a wide variety of plants. They hatch from eggs during the warm weather months, and eat until they are mature. During the fall, they seek out safe places to hibernate until spring. They will often hibernate under rocks, logs, cavities in bark, etc.
They remain as caterpillars until spring when they spin their cocoons. About a week to two weeks later, the adult moth emerges to begin the life cycle all over again.
Baking: A Soccer Ball Birthday Cake
Wednesday, July 23, 2008
A Garden Gnome to bring Good luck
I recently obtained this little garden gnome - he came free with some other treasures - not quite sure what I should do with him. I looked up the history of garden gnomes and found that they are said to bring good luck.- Maybe I should keep him?
Here is some info from lovetoknow:
Garden Gnome History
In folklore, gnomes are small, gentle woodland creatures who wear pointy red hats. They work by night and can live to be four hundred years old or more. Garden and house types are the most commonly represented gnomes. According to legend, these helps with chores such as sweeping and planting. This is why many traditional gnome statues hold garden tools such as rakes or shovels or are pushing wheelbarrows. Many statues made today depict them sleeping, reading, or otherwise relaxing.
The first clay versions were made in Germany in the 1800s. The garden gnome became especially popular during the Victorian age and again in the 1930s and 40s. Starting in the 1960s, mass-produced and badly painted plastic gnomes became ubiquitous, causing them to lose respect for a time. But they have made a comeback.
Making a Comeback
Recently, the garden gnome has become something of a pop culture icon, appearing in movies, in ads, and on the Internet. The current popularity might be traced back to the 1997 film, The Full Monty. In the film, a guy is distracted during a job interview when his friends stage a battle with his garden friends outside a window behind his interviewers' heads. In the 2001 film Amelie, the lead character inspires her widowed father to travel by sending his on a world tour.
In Europe especially, kidnapping the characters became a popular practical joke. Shortly after a garden gnome is stolen, the owner begins to receive pictures of the him in various places the kidnapper has taken them. A kidnapped statue was the focus of an ad campaign for travel website Travelocity. The "Roaming Gnome" first appeared in late 2003 in a series of ads inspired by the traveling prank. The company initially provided a website called www.whereismygnome.com, to track the movements.
Another satirical website, www.freethegnomes.com, provides information about the Garden Gnome Liberation Front (GGLF). The GGLF calls for an end to oppressive gardening and freedom for garden gnomes everywhere. Sadly, emancipation is sometimes taken too far, with liberators abducting gnomes, photographing them at international landmarks, and sending the pictures home to their former owners with ransom notes. In 2000, to counter the activities of the GGLF, the International Association for the Protection of Garden Gnomes was founded in Switzerland. The group's president has attempted to have legislation passed making the theft a criminal offense
Garden Gnome Collecting
For some people, collecting becomes a passion. More casual collectors may need just one perfect gnome-- to bring good luck or simply to accent their garden or home. While a garden is the most likely place for a gnome, they are also appropriate indoors. A well-placed statue can add the finishing touch to your fireplace hearth, bedroom, or bath.
There are now many high-quality, attractive versions available. Today’s a garden gnome is made of clay, concrete, or poly resin, and is available in a variety of sizes.
The statues range in styles from traditional to kitschy. There are fishing, musical, biker, and patriotic gnomes. There’s even a George W. Bush version.....
Tuesday, July 22, 2008
Friday, July 18, 2008
Baking: Cinnamon Bun Scones
I made these this morning - They were great with coffee. It has been a while since we have made scones- We used to try new recipes quite often. These were super easy!
The recipe comes from There is No Place Like Home.
Cinnamon Bun Scones
A cinnamon-pecan swirl and creamy glaze imparts the flavors of a bake-shop cinnamon bun to these easy-to-make oat scones
Makes 12 scones.
SCONES:
2 cups all-purpose flour
1 cup quick or old fashioned oats
10 tablespoons granulated sugar
1 tablespoon baking powder
1/4 teaspoon salk
8 tablespoons butter, chilled and cut into pieces
3/4 cup milk
1 egg, lightly beaten
1 teaspoon vanilla
1/2 cup pecans (optional)
2 teaspoons ground cinnamon
GLAZE:
3/4 cup powdered sugar
3 teaspoons orange juice or milk
DIRECTIONS:
1. Heat oven to 425F. Spray cookie sheet with cooking spray.
2. In a large bowl, combine flour, oats, 8 tablespoons of sugar (set aside remaining 2 tablespoons for later), baking powder and salt; mix well. Cut in butter with pastry blender or two knives until mixture resembles coarse crumbs. In small bowl, combine milk, egg and vanilla; blend well. Add to dry ingredients all at once; stir with fork or rubber spatula until dry ingredients are moistened. In small bowl, combine remaining 2 tablespoons granulated sugar with the pecans and cinnamon; mix well. Sprinkle evenly over dough in bowl; gently stir batter to swirl in cinnamon mixture. (Do not blend completely.) Drop dough by 1/4 cupfuls, 2 inches apart on cookie sheet.
3. Bake 11 to 13 minutes, or until golden brown. Remove to wire rack; cool 5 minutes. in small bowl, combine powdered sugar and enough juice or milk for the desired consistancy; mix until smooth. Drizzle over top of warm scones. Serve warm.
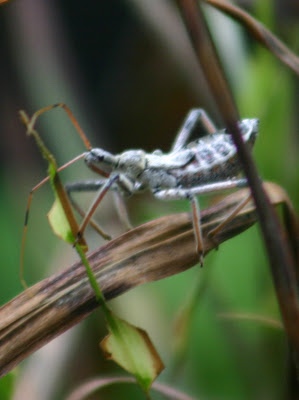
What kind of bug is this?
I found this bug hanging out on a pot of ornamental grass this morning. The boys have been collecting bugs lately and then trying to identify them. Cade told be about this cool site that helps people figure out what insect they have. It is called Whats That Bug
I think this is some kind of An Assassin Bug- and after reading - i think it may be The wheel bug, Arilus cristatus, as it is one of the largest and most easily recognized assassin bugs. it is a good guy to have in the garden since it eats many of the insects that destroy plants.
Here is some info that I found:
"There are more than 160 species in the family Reduviidae (the assassin bugs, ambush bugs, and thread-legged bugs) in North America, many of which are fairly common. Most assassin bugs are medium-sized to large predators of crop pests, but the family does contain a few blood-sucking species. Even the beneficial insect predators can inflict a painful bite if handled carelessly, resulting in an inflammation that can persist for a few days.
Adult assassin bugs are usually 1/2 to 3/4" long. Many species are brownish or blackish, but some species are brightly colored. The elongated head is narrow with a distinct "neck" behind the often reddish eyes. The long, curved mouth parts form a beak which is carried beneath the body, with the tip fitting in a groove on the underside of the body. The middle of the abdomen is often widened, so the wings don't completely cover the width of the body. The female lays eggs in tight, upright clusters on leaves or in the soil. Nymphs resemble miniature, wingless adults.
Most assassin bugs are generalist predators in gardens and fields. They sit in wait of prey and are most likely to attack small flying insects, however they can subdue and kill medium-sized caterpillars and similar insects. Some prey in vegetable plantings include aphids, leafhoppers and asparagus beetle eggs and larvae. They may feed on beneficial species as well as pests. Although they have not been specifically manipulated for biological control, they do contribute to natural control and their conservation by judicious pesticide use is beneficial. The adult is about 1 1/4" long, gray in color, and has a striking semicircular crest on the upper back that looks like a cogwheel. Females are much larger than the males. This species is an important predator of forest insects. Wheel bugs feed on aphids as young nymphs. Later they attack caterpillars such as the fall webworm and other pests such as the locust borer. This species is common in the eastern United States.
There are several other species of assassin bug that feed on forest insects including pine webworm, gypsy moth, and May beetles. Another commonly-encountered assassin bug is the masked hunter, or "masked bedbud hunter." This brownish-black bug is often found in houses, where it feeds on bed bugs. Unfortunately it will also bite people. The soft-bodied nymphs cover themselves with dust, earning the name "dust bugs."
Ambush bugs are smaller (1/2" or less), stout-bodied insects with thickened, praying mantid-like front legs. Although they are small they can capture much larger insects, such as bumble bees. They lie in wait for their prey on flowers. Goldenrod is a favorite flower, where their greenish-yellow color allows them to be well camoflouged. Their prey is mostly large bees, wasps and flies, so they do not contribute much to insect pest control in plantings."
- Susan Mahr,University of Wisconsin - Madison
Healthy Dinner: Lentil Walnut Burgers
These were surprisingly very good. I was amazed at how much they looked like hamburgers! The recipe comes from Martha Stewart Everyday Food.
Lentil-Walnut Burgers
3/4 cup lentils, picked over and rinsed
3/4 cup walnuts
1/3 cup dried breadcrumbs
3 cloves garlic- chopped
2 tsp cumin
2 tsp coriander
1/4 to 1/2 tsp red pepper flakes
course salt and fresh ground pepper
4 T olive oil
1 large egg
Yogurt-cilantro sauce for serving
3/4 cup plain low-fat yogurt
2 Tablespoons chopped fresh cilantro leaves
1 Tablespoon fresh lemon juice
Course salt and fresh ground pepper
Preheat oven to 350 degrees. Place the lentils in a small saucepan, and cover with water by 1 inch. Bring to a boil; reduce to a simmer. Cover, and cook until the lentils are tender but still holding their shape. 15 to 20 minutes. Drain well and cool.
Spread the walnuts on a baking sheet and toast in the oven until fragrant and darkened, about 10 minutes. Let cool.
1. In a food processor, combine walnuts, breadcrumbs, garlic, cumin, coriander, pepper flakes, 1 1/2 teaspoons salt, and 1/4 teaspoon pepper; process until finely ground. Add lentils and 1 tablespoon oil; pulse until coarsely chopped (some lentils should remain whole).
2. In a large bowl, whisk egg. Add lentil mixture; mix well. Divide into 4 equal-size parts; roll into balls, and flatten with the palm of your hand into 3/4-inch-thick patties.
3. Heat remaining 3 tablespoons oil in a large nonstick skillet. Add burgers; cook over medium-low heat until crisp and browned, turning gently with a thin-edged spatula, 8 to 10 minutes per side. Transfer to a paper-towel-lined plate to drain.
Per serving (without sauce): 460 calories; 28.9 grams fat; 18.7 grams protein; 35 grams carbohydrates; 13.6 grams fiber
Yogurt Cilantro Sauce
1. In a small bowl, whisk together yogurt, cilantro, and lemon; season with salt and pepper.
Thursday, July 17, 2008
Drinking: Limeade with a Touch of Mint
The boys and I made This Limeade the other day. It was so good so we bought some fresh limes and are going to try it again today. The recipe comes from simply recipes.
Infusing the sugar syrup with lime zest is a great way to bring extra lime flavor to your limeade.
Ingredients
* Grated zest of one lime (about 1 Tbsp)
* 1 cup lime juice (from about 4-6 Persian limes)
* 3/4 cup to 1 cup granulated sugar
* 3 cups water
* Several sprigs of fresh mint
Method
1 In a small saucepan bring to a boil the sugar, one cup of water, and the lime zest. Once the sugar is dissolved (which it should be by the time the water boils), remove from heat and let cool for for a few minutes. The amount of sugar is a guideline, it depends on how sweet you like your limeade and how tart your particular limes are.
2 Place a strainer over a bowl, or wide-mouthed serving container, and pour the sugar syrup through it, straining out the lime zest. Add the lime juice and 2 cups of water. Taste for sour/sweet balance. If too sweet, add a little more lime juice. Add several sprigs of fresh mint.
Chill, or serve immediately over ice.
Makes about 1 quart.
Making: The Ultimate Strawberry Truffles
Here is a great little no-bake summery dessert. These are so easy and look impressive.
Ingredients:
9 ounces chocolate wafer cookies, finely crushed
1/2 cup butter, melted
1 cup whipping cream
12 ounces semisweet chocolate pieces- 2 cups
1 T strong brewed coffee
2 tsp Triple sec or other orange liqueur- I used a pear liqueur
1/2 tsp vanilla
12 large strawberries with stems, rinsed and patted dry
1 cup strawberries, hulled and cut
In a large mixing bowl, combine the chocolate wafer crumbs and the melted butter until well mixed. Press the crumb mixture into the bottom and sides of twelve 2 1/2 inch muffin cups lined with paper bake cups. Set aside.
In a medium saucepan, heat cream over medium-low heat just to simmering. Remove from heat. Place chocolate pieces in a medium bowl. Pour cream over chocolate and let stand 10 minutes ( do not stir ) Add the coffee, Triple Sec, and vanilla; stir until mixture is creamy. Cover and chill about 45 minutes or until thickened.
Beat chocolate mixture with an electric mixer on medium to high speed until lightened in color and slightly fluffy. Pipe or spoon mixture into crumb shells. Press one large strawberry with stem into the center of each truffle. Cover and chill truffles until very firm about 2 hours. Place cut strawberries in a blender and process until smooth. Cover and chill until ready to serve.
To serve, remove truffles from muffin cups and place on a serving platter or dessert plates. Drizzle some of the pureed strawberry sauce on each strawberry truffle. Makes 12 servings.
Discovering: Texas Brown Snake
We have finished moving a very large pile of compost - Omagro- . This pile has been in our driveway since spring. The rainy weather made it difficult to get outside and get the job of moving it done and then it is a slow job of spreading it around the yard when all the plants have grown together. I usually like to do this in the early spring before everything is growing. Our hostas have just exploded after placing a large scoop around each one. In the middle of the pile we found this little brown snake that seemed to be flat. I had never seen one before. But after identifying it and reading about them - The Texas Brown snake is a commom snake to find in Nebraska backyards and even better they are great to have in gardens. Here is some info about them.
Texas Brown Snake
Storeria dekayi texana
Nonvenomous
"The Texas Brown Snake is a very common snake, and is highly variable in color, ranging from browns to tans and even brick reds. The color of Texas Brown Snakes is fairly even, though, with the exception of a faint lighter stripe down the middle of the back. Additionally, the top of the head and the corners of the mouth are darker in color. These dark 'spots' on the sides of the head can resemble large eyes when the head is flattened out. This makes these small harmless snakes seem larger and more dangerous than they really are, since hatchlings are the size of an earthworm, and even adults are no more than 13 inches long.
Texas Brown Snakes are completely harmless if encountered, but will readily feign aggressiveness to defend themselves. This usually involves coiling up, raising the head, striking out repeatedly at anything that gets too close and vibrating the tail. This is just an act to get larger animals to leave them alone, however, since they generally strike with their mouths closed, and their mouths aren't large enough to grab human skin even if they tried!
Texas Brown Snakes can be found just about anywhere there is a cool dark moist bit of soil - like nicely mulched landscaping - which is why they are so commonly seen.
Texas Brown Snakes eat a wide variety of suitably sized insects and other invertebrates, including snails and slugs, making them a gardener's friend. After all, you decide what's better - slugs or brown snakes!"
Subscribe to:
Posts (Atom)